Saturday, July 13, 2013

Pennant Parade Christmas!

Happy Saturday morning to you!  Before I head off to the market to see what's new, I'll share another little Christmas card from my "Christmas in July" stampers club.  For this card, I was showing them how to make a 3-D little Christmas tree, that folds flat to mail.


The colors used here are Midnight Muse, Soft Sky -- a returning color from the past, Gumball Green and Whisper White.  For the little trees, I simply stamped the banner images and punched them out with the Pennant builder punch, and for the 3-D tree, I stamped three trees in Gumball Green ink on the same cardstock, and punched them out, folded them in half, and glued the halves together -- putting the "seam" towards the back when I adhered it to the card.  So simple, but looks so super cute!  For the snowflakes on the Midnight Muse, I used the Illuminate ink pad -- it is like a shimmery Versamark.  Love how it looks glimmery in real life.  These snow flake images are from the Snowflake Soiree stamp set from last year's Holiday mini.  Even though this set is not featured in the catalog, it is still available to order.  I was so happy as I LOVE this snowflake set.  One of the prettiest ones we've ever had.

For the "snow", I took a strip of Whisper White card stock -- 2 1/4" by 5 1/4"-- and tore it in half lengthwise in a bumpy pattern, adhered my strips to the base, and then added Dazzling Diamonds glitter to the torn edges with my two way glue pen.  Gives such a lovely look of snow, with so little effort!

Ok!  I'm off to the market now, with my kiddos in tow, as Jon is working today.  Should be fun. :)  Kettle corn here we come!

If you haven't seen it yet, the special this month is free DSP -- Buy three packs of DSP and get the fourth FREE!  Whoo Hoo!!!

Friday, July 5, 2013

Mad for Mosaics

The new Mosaic Madness stamp set and matching punch and embossing folder, is designed for a bit of a modern look, I think, but I've been enjoying some non-traditional uses for it, too.  I've been envisioning a poinsettia with this punch and stamp set, and finally had some time to play with it earlier this week.  The hostess for one of my club classes this month, wanted to do a "Christmas in July" theme for the projects, so I had a good excuse to try the poinsettia hanging out in my mind's eye!:)

The colors I chose, are Cherry Cobbler, Basic Black, and Sahara Sand.  Also used some of the Champagne shimmer paper for the center of the flower and the border along the bottom -- just punches with the mosaic punch lined up under the designer paper strip.


Here's another flower card using a new In Color that I LOVE -- Coastal Cabana -- and I paired it with Island Indigo and accents of Pumpkin Pie DSP from the Quatrefancy DSP pack.  Check out that cute little candy dot used to accent the flower.  They are a new product that comes in all of our core colors -- here I used a Tempting Turquoise one which matched my color scheme quite well.


And NOW for a more traditional use of this stamp set and punch -- we made this card at my recent New Catalog Open House.  It uses the exact same colors and products as the above card, but what a different look!


Ok!  that's it for today!  Must get something done around here besides being on my computer. My kids are both sleeping in, as we stayed out till almost 1 last night watching fire works and such.  We had a grand time, but little Bina was pooped.  She kept asking if she could "take a nap" at around 10 pm.  What a little pumpkin!  Love her to pieces, I do!  And my little/big 8 year old was having the time of his life playing with sparklers and overseeing his Daddy's fireworks display plans!  Love my kiddos.  They're great -- most of the time! :)

If you haven't heard, there is a July special:  buy three packs of DSP and get the fourth FREE!  Gotta love free!

Tuesday, July 2, 2013

Flower Shop is here!!!

Good Morning to each of you! Before I get sucked into the day, I'll share a little treasure with you.  The new "Flower Shop bundle" is BEAUTIFUL!  -- a lovely flower stamp set, with whimsical, modern, as well as realistic flower images, AND a punch to match it, so you can stamp and punch.  Yep!  Love it, gotta have it, can't live without it!  And nor can you! :)

Here are a couple of cards I've made with it.  This first card uses two new In Colors -- Coastal Cabana and Strawberry Slush, as well as the Quatrefancy DSP.  I made a vellum window in the front of this one, which I embossed with the Mosaic embossing folder, and you can see the inside sentiment through the window.


Now for an elegant twist on this same set.  I paired it with the Everything Eleanor fourish stamp, and the colors used here are two new In Colors -- Baked Brown Sugar (a really nice brown) and Crisp Cantelope as well as Early Esspresso and Very Vanilla.  We made this card at my New Catalog Open House this past Sunday. 


Of course, you know me, gotta have a little sparkle, so I added Dazzling Diamonds glitter to the flower centers with my two way glue pen. 
My next "in my head creation" with this stamp set, is a black and white with a pop of red, card.  I can just "see" it in my head, but alas, other stuff to do today, so my creation will have to wait for some time to play.

On a different note, there is a new SU special for the month of July -- buy three packs of designer paper and get the fourth pack FREE!  Don't think you need 4 new packs of paper (gasp!)? buddy up with a friend and split the savings -- it's like getting it for 25% off.  Whoo Hoo!!!  May I suggest the Modern Medley DSP -- it's black and vanilla and GORGEOUS!  LOVE this paper!!!

Anyhoo... On with the day!

Happy Summer, and Happy crafting, and visit my online store to see what's new and great and what YOU can't live without. :)



Friday, June 21, 2013

Regarding Dahlias = Happy!

On my first browse through the new SU catalog, the "Regarding Dahlias" stamp set was at the very tip top of my (huge) list...  Love the simplicity and simple beauty of this set. But,... of course, I DO love flowers -- I always have ever since I was a little girl...

I decided I wanted to try it first in Black and white and yellow.  This is a card we will be making at my upcoming New Catalog Open House.  The designer paper used here is from a new DSP pack -- Quatrefancy Specialty DSP.  To color the dahlia, I first stamped it in black ink on whisper white card stock, then used a sponge dauber and added Daffodil Delight ink to the center and fading out to the outside petals with a sponge dauber.  I then did a little fussy cutting and plopped it on my card.  Other products used on this card, are the new Artisan Label punch and the not-so-new Hexagon folder.  Of course, a girl has to add just a little sparkle, so I used my faithful two way glue pen and added some dazzling diamonds glitter as well as some basic rhinestones colored black with my Sharpie. :)


For this next card, I tried playing with a new In Color -- Strawberry Slush.  It is a beautiful, non-offensive pink, if you know what I mean. :)  Not Pepto Bismol ish, too be exact....  I used the new Deco Label Framelits.  I love the shape of these new framelits.  I know they will see many a project in my home!  Also, the new magnetic platform is worth all of it's $39.95 price!!!!!  It holds your framelits perfectly still so they don't move when you put that baby through your Big Shot!  No more sticky notes to hold your framelits in place needed!  Love, Love, LOVE this new product.  Ok, on with the card. :)  Used the Quatrefancy DSP again on this card, as well as the fancy fan embossing folder.  This card is a little less work than the yellow one in that there is no fussy cutting -- simply stamped my dahlia on the deco label die cut.
Happy Friday and Happy first day of summer to each of you, and may you get your stamping mojo on -- if you're not out camping this weekend, that is. :)

Friday, June 14, 2013

Wilted Ribbon Flower wine tag

Good Morning, Friends!  The kids are still in bed, and I am posting to my neglected blog.  Yippeeee!:) 

At my last stampers' club, we made this wilted ribbon flower on a wine tag.  This technique works amazingly with satin ribbon, which SU no longer carries, so I used our white organdy ribbon, and showed the gals how to dye the ribbon Rich Razzleberrry to match the tag, simply by pressing the white ribbon into the Razzleberry ink pad, and giving a few drags across the pad until the desired purple was achieved.  For this flower, I used 25" of ribbon, and for the base of the flower, I applied some sticky sheets to whisper white card stock, and then cut circles with my Circles #2 die -- using the second largest circle.  Of course, SU now has jumbo sticky rounds -- which would make this even easier.  Pull off a sticky round, apply it to card stock, trim it down to the size you need and you're set.  I saw how to make these flowers on this video tutorial. 

Without further ado, here is what we made!


Isn't that flower just gorgeous?  You could use it for so many applications -- scrap booking, hair bows, lovely gift wrapping, etc.  The colors used here, are Rich Razzleberry, Whisper White, and Pretty in Pink (a now retired color).  That beautiful stamp that serves as the "stem" for the flower, is from the "Everything Eleanor" stamp set -- LOVE that flourish!  It is so elegant and a tad bit vintage.  I don't generally do vintage well, but I admire those who do!

Happy Friday, Everyone!  and be sure to check out the new amazing SU catalog!  More hot-off-the-press projects coming soon.

Beth


Monday, June 10, 2013

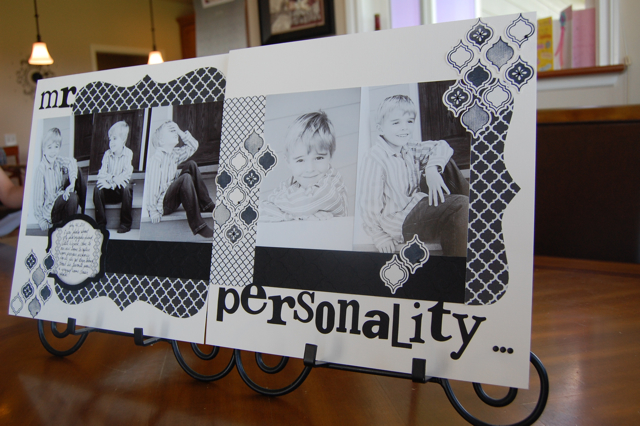
Mr Personality!

Life has been crazy busy around our home with end of school things going on, a parking lot garage sale/fund raiser at Bryn's school, and a certain big boy's 8th birthday party this past Saturday. Thirteen 7 and 8 year olds racing around our back yard for 2 hours!  Wow!..... There has been NO time for this mama to play... Well, yesterday, I told the kids that I needed some time to myself -- that they needed to find some things to do, as Mama was going to STAMP!!!  and, they mostly entertained themselves, only interrupting me for important things like food and potty help for the almost three year old.

SOOO, this is what I made.  It is a scrap layout for my scrapping class this coming Friday night, and it features some beautiful, unique, hot-off-the-press new SU treasures, such as: the Modern Medley Designer series paper, the mosaic punch, the matching Mosaic Madness stamp set, the Modern Mosaic embossing folder, the new, awesome! candy dots, and the Deco Label framelits (used for the journaling).  These are photos that a photographer friend, Celeste Wyrick of Wyrick Photography, took when she did a photo shoot for our family shortly after we moved into our new (to us) house 2 years ago.  I have never made a black and white layout before, and whenever I teach a scrap booking class, I always try to do something I haven't done before, to try and keep it interesting and fresh.

The inspiration for this layout, came from a super cute hexagon layout I saw in the CTMH catalog.  There are so many places to find inspiration, and when I saw what they had done with the hexagons, I was thinking, "Hey! I am going to do this idea with a black and white layout with my new mosaic punch and stamp set".  I have to say, I really do like the way it came out.  If you live near me, come to my class this Friday at 6:30 and make it for yourself! :)

Oh, and if you haven't checked out the brand new catalog, click on the link in the upper right corner, OR if you're one of my customers and haven't gotten your very own, gorgeous copy, email me for your free copy today! :)

Happy Monday to each of you!


Sunday, May 26, 2013

One card, Three ways

At my last club classes, I wanted to show the double embossed frame technique -- see this link for step by step how to do this. It is such a cool technique that is really not that hard to do.  The only thing I did differently, is that I made the opening in the chipboard for the back of the first folder, slightly larger than the size of designer frame, so that a larger rectangular non-embossed section was created.  Hope that makes sense...

Here are the cards they could choose from:

This first one uses the "Happy Hour" stamp set
 For this second one, I used the "World Spectacular" stamp set -- pretty much a CASE of the idea Dawn had in the video link above.
 And this one uses the "Just Believe" stamp set -- which is soon to retire.  Boo hoo!


We used Crystal Effects on the leaves to make them shiny, as well as on the tips of the peacock feathers in the above sample. 

The colors used here, are Lucky Limeade (soon to retire), Midnight Muse, and Whisper white -- along with several strips of designer paper from various packs.

If you haven't gotten all the retiring products you are longing for, be sure to get them before they're gone!  Hope on my website in the link below and check out all the treasures that are 40% off!  My favorite accessory that's retiring, is the Blossom Petals Builder punch.  You can search my blog for amazing things I've made with this punch -- including dogwood flowers.  In my book, you simply can't live without this punch! :)

Happy Sunday to each of you!!!