Saturday, September 6, 2014

Ooh La La! Blended Bloom

Happy Saturday, Everyone!

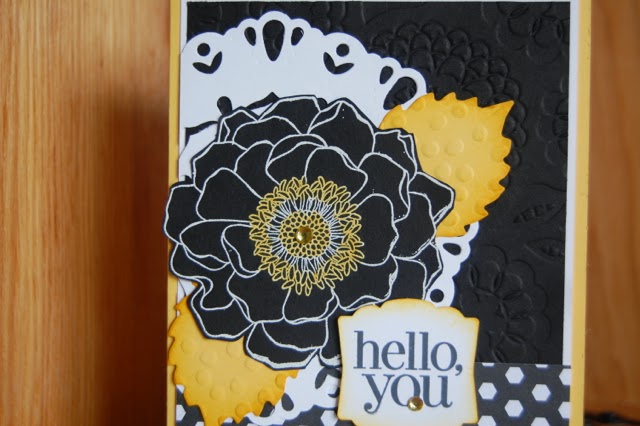
Today's card is one I made for a Wow card swap I participated in at Convention this year.  I have to say that I LOVE how this card turned out.  The color combo of Black, White, and Daffodil Delight is so striking -- hard to go wrong...


A super cool technique that I incorporated into this card is using the Blendabilities markers to color on top of a white embossed image.  So, I first embossed Blended Bloom using Versamark and white embossing powder on black card stock.  I then simply colored in the center of the bloom with my Dafodill Delight Blendabilities markers.  Because the card stock is black, you can't see the "out of the line scribbles" with the marker.  Pretty cool, right????  Really makes this flower pop.  I also colored the rhinestone with the blendabilities.

Of course, then I fussy cut the flower out.  Yep!  All 20 of them!  The leaf is cut from Daffodil Delight card stock from the Autumn accents die.  I simply embossed the leaves with the dots embossing folder and sponged the edges with Crushed Curry ink.  That gorgeous white doily thingy is the new Darling Doily thin lit die.  I don't know if any of you tried the doily die from the last catalog, but it was a bit HARD to use -- so much so that I stopped demoing it.  THIS one, however, is fabulous and comes out easily and beautifully every time.  SO happy as I love this look.  One trick, put waxed paper between your die and the card stock before you cut and your doily will pop out super easily.

The black panel is embossed with the Lovely Lace embossing folder.  I used the Artisan Label punch and a sentiment from the Regarding Dahlias stamp set, using the new Tuxedo Memento Black ink pad.  THE new awesome black!  In my opinion, toss your old SU Basic Black in the... uh ... trash... and get this new awesome one.  No more smearing, washes off your stamp easily, and gives you a crisp perfect image every time!  AND, it doesn't stamp purple as some of the old black used to do sometimes.  

That cute strip of black and white DSP is from the Black to Black pack.  I admit I wasn't sure how much I loved this paper, but in real life it is so much prettier than in the catalog -- and if you don't like one side of it, the other side is generally much better.  Just an FYI.

Ok! off to enjoy this gorgeous day!  Think I'm going to wash my dirty windows and not sure what else...  According to four year old Sabina, there is a lot of "Mama time" lined up for the day -- coloring together, Kinetic sand creations, and Barbies! :)  My little sweetheart is growing up... but I'm glad she still likes to be with me.  AND, she has the crafty bug as big as her Mama's which makes my heart happy.  She has her own desk and faithfully colors and paints every single day -- sometimes several times a day.  LOVE it!

If you haven't seen the new Holiday catalog yet, it is really great this year!  I think it is one of the very best yet.  So excited about it!

Until I stamp again!...

Friday, August 8, 2014

Flower Frenzy and Spiral flower die Fall Wreath

Happy Friday, Everyone!
I have a project to share with you today that I am super excited about!  I've been wanting to experiment with making burlap flowers for a while, and decided I wanted to do a fall wreath class, so I jumped in with both feet and pretty much have a comprehensive collection of all the burlap "flavors" that Joanne's carries! :)

I had so much fun putting this together -- totally satisfied my need for a "crafty fix" -- at least for today. :)

I used the SU Spiral Flower Bigz die for the rosettes and the Flower Frenzy die for the bigger die cut flower.  The rolled looking flowers, were made by rolling up the SU burlap ribbon into a flower.  For the larger two-tone flowers you see, I put two of the spiral die cuts together -- staggering the scallops slightly so they weren't directly on top of each other.  Those little wooden leaves you see in one of the photos, are the new Autumn Wood Elements that will be available in the Holiday catalog coming out on August 28th.  Also used in this project, are Basic Pearls, Antique brads, and a whole lot of hot glue.

Be inspired to get your crafty on this week! OR, if you live near me, come to my class on Sept 5th or 7th!

Be sure to check out this weeks weekly deals as well as the Big Shot bundles promotion happening in August -- buy a Big Shot and get a bundle FREE! OR if you already have a Big Shot, get a bundle for 15% off.  See my website for more details.

Until I craft again!....


Wednesday, July 30, 2014

Blended Bloom gets a wash!

A new single stamp in this year's catalog, Blended Bloom, jumped into my online cart the first time I saw it.  It is a gorgeous image to color in -- either with the Blendabilities markers like I did here, or several different techniques -- like this Water color splash technique like we did at my last class or embossing it in white embossing powder on black card stock and coloring parts of it in with the Blendabilities markers -- stay tuned for a post on that technique later.  (Here is another link with all the detailed instructions of how to do this technique.)  A cute side note -- at my first scrap booking class after the new catalog came out, a long time customer of mine saw cards I had made with the Blended Bloom stamp and said, "Oh, I knew you would get that stamp!  I saw that stamp and said "THAT is a 'Beth' stamp."  I will admit, this stamp makes me happy. :)


This was a card we made at my stampers club earlier this month.  Besides the watercolor splash technique, I showed my peeps how to use the Daffodil Delight Blendabilities markers to color on top of the white embossing in the center of the flower to make that stunning center look so realistic.  Hard to see in this photo, but we also stamped the background of the card base with the same Blended Bloom image in Versamark to create that water mark look -- i.e. another use for the Versamark pad.  Those cute leaves are cut using the Autumn Accents die.  I showed how to use a stylus to create "veins" in the leaves to make them look more realistic, as well as sponging the leaf edges to add color depth.  Simple, but adds a wow factor.  Of course, I used the Itty Bitty Banners stamp set and matching framelits to create the little sentiments.  AND some Dazzling Details to add some sparkle to the flower centers.  The colors used on this card are: Rich Razzleberry, Mossy Meadow (a new In Color), Blushing Bride, and Shimmery White card stock for the flower part.  Important note: you DO need the shimmery white card stock to achieve this look with this technique.  Something about the way it resists water or something.

If you haven't checked out this weeks "weekly deals", you simply must!  The  Gift Bow Bigz Die is 25% off this week!  Besides making, well, bows... check out the adorable snowman or these santas or my favorite -- these little angel ornaments.  Such clever projects really thinking outside the box.  To see the weekly deals, click on the link below and then on the Shop button from my website.

Happy Wednesday to each of you!!!

Monday, July 28, 2014

My wee moment in the spotlight!

Happy Monday, Crafty Friends!

I recently returned from a super exciting adventure -- my very FIRST SU Convention!  It was more than incredible -- inspiring, thought provoking, and just plain FUN!  The theme this year was "Inspire, Create, Share" and attending this event made me realize what a difference SU really does make in the lives of people everywhere -- in small and big ways.  I personally have seen that some of the best friends I've made over the years are ones I've met through stamping....  And these friendships have motivated me to continue "doing" Stampin' Up!  Anyways, 2014 marks my tenth year as a SU demonstrator, and I have never gone to Convention, so it seemed fitting that this was the year I should go.  My wee moment in the spotlight, was walking across the stage to commemorate my 10th year as a SU demonstrator.  So,.... here I am!!!


And here is a photo with two of my Seattle uplines, Michelle and Christine as well as my downline, Audrie.

And, finally, there was this really cool photo booth where the wall was solid paper flowers!  Big, gorgeous paper flowers.  Still not quite sure how they made these -- perhaps with MDS and a big cutter of some sort???  Lovely!

One of my very favorite things at the Convention, was all the sample boards.  I took MANY photos of them and enjoyed basking in the sheer creativity of demos from all over the world!  I also participated in several organized swaps and received some beautiful samples back.  Wooo Hooo!

Ok, off to get going with my day! :)

Monday, July 7, 2014

Flower Patch happiness

Happy Monday, Everyone!  Hope that each of you have recovered from July 4th craziness. :)  For us, the kids finally went to bed last night closer to the usual 8:30 time, rather than after midnight.  Yikes!  My pyro husband did TWO big fireworks displays this year -- one on the 4th, and another on the 5th.  And, oh yes, don't forget the "trial runs" on the night of the 3rd! :) So,.... we were all ready for a good nights sleep and now a week of "normal" :) routines!  As I type this, the kids are both still snoozing -- which, for my early bird son, is unusual!

A brand new photopolymer stamp set and matching framelits called "Flower Patch bundle" caught my eye instantly when I opened this year's new catalog.  Its many stamps are designed to work together to create all different combinations of two-step (or multiple) stamped images -- i.e. you stamp the base flower or leaf image, then stamp one or more images on top of that original one.  It also has matching framelits so you can die cut any of the images to create dimension.  Because it is a photopolymer stamp set, it is completely clear so it's easy to see through the stamp to ensure the placement of your image.  There is a tad of a learning curve with photopolymer stamps -- they stamp slightly differently than the regular rubber -- and you will get a much better image if you place the stampin' pierce mat underneath your card stock before you stamp.

This card is one we will be making at my next stampers' club next Sunday.  It's a card of options -- choose to make it with the new "Flower Patch Bundle" (save 15% off the price when you purchase the framelits with the stamp set) or the "Beautiful Bunch" stamp set and it's matching fun flower punch.  The truth is, I couldn't wait to show off ALL my new toys, so here you go! :)


For the Flower Patch card, I used these inks: Pool Party, Lost Lagoon (a new In Color), Calypso Coral, Real Red, Wild Wasabi, Mossie Meadow (another new In Color), and Early Espresso.  Isn't the layering effect incredible???  There are multiple images I could have incorporated into this card, but I decided to try and keep it on the simpler side -- i.e. I could have die cut each flower color to make a 3-D flower, or added several more flower images, but I still love the effect created with the simple stamping!  For the "other" card, I stamped images from the Beautiful Bunch set and punched them out with the matching Fun Flower punch.  The leaves are made with another flower image from the set -- stamped in Wild Wasabi ink and cut the petals apart to make the leaves.  The white panel behind the flowers, is embossed with a brand new embossing folder -- lovely lace embossing folder.  The card stock used here is Pool Party for the card base, and Whisper White and Early Espresso for the front panel.

There's a sweet special for the month of July -- buy three packages of the designer paper priced at $10.95 and get a 4th pack FREE! so it's like getting 25% off your paper.  If you're not sure you "need" four packs of paper, go in with a friend and split the special. :)

One more news flash -- seven color assortments of the Blendabilities markers are now available for purchase: Cherry Cobbler, Coastal Cabana, Daffodil Delight, Rich Razzleberry, Old Olive, Pumpkin Pie, and the Skin Tone assortment.  The remaining color offerings will be available August first.  If you haven't tried these new alcohol based markers out yet, you simply must!  The blending abilities are outstanding -- see 

Tuesday, June 10, 2014

Hexagon Hive beauty

Happy Tuesday, Everyone!

I don't have to work today -- Yippee Skippee! -- so why not post to my neglected blog?  Here is a card that I made for a swap with my Seattle stamping friends a couple months ago.  I featured the new hexagon hive thinlet die.  For this card, I started with a Rich Razzleberry card base, for the next layer, I used a 4 1/8 x 5 3/8" panel which I sponged randomly with Tempting Turquoise and Rich Razzleberry ink.  Then, I cut the hexagon hive panel -- tip: put the panel through your Xyron sticker maker machine before cutting it out, so you can simply peel off the backing and stick it to your project.  I then used the Petite Petals stamp set and matching punch to make the little flowers.  I then stamped the sentiment and cut it out with the Banners Framelits, as well as a coordinating designer paper layer and a little bit of (now retired) ruffled stretch In Color ribbon trim.  Fun little card that really makes the hexagon hive framelit pop.


If you haven't seen the new catalog yet, it is awesome!  Come to my New Catalog Open House on June 29th to get your own copy and make some cute FREE projects: http://www.meetup.com/Flathead-Valley-Stampers/events/184749222/

Happy Day to you and yours!

Saturday, May 31, 2014

Oh Happy Day!

Happy Saturday Everyone!

We have plans to do something besides gardening today, since Jon is finally NOT on call this weekend, so before I get caught up in our exploring plans, I will post this fun layout to my blog.  We will be making this at my next scrapbooking class on June 13th.  Come on over and create with us if you like!

These pictures were of my son's 3rd birthday.  He was hugely into fire trucks at that time, and his Nana had gotten him a special fire truck outfit for the occasion.  AND, I had tried my hand at making a fire truck cake.  Jon did a great job of capturing his three year old sheer excitement on camera!  I just LOVE the focal pic of him clapping his hands and that grin lighting up his whole face!  Next week my cute little boy turns nine!  He is quickly turning into a handsome young man.  Wow where has the time gone.....

I got the idea for this layout from a sketch I saw from a CTMH layout on Pinterest.  That layout was very elegant and beautiful, but I wanted to go a different direction with my layout and use primary colors and bold imagery as I thought it suited these 100% boy pictures.  The white panels you see on the layout, are stamped in Real Red ink with an image from the "Starburst Sayings" stamp set.  I then used a scrunched up pc of Saran Wrap to add some textured color in Crumb Cake ink around the bold red images.  The beauty of this layout is that you can change the stamps used on those background panels and change the entire look of this layout -- for example, the lovely flourish stamp from either the Everything Eleanor or Flowering Flourishes stamp sets, would look lovely stamped randomly over the panel.  Then, instead of the bold embellishments on the lower right corner of the right hand page, add some stamped/punched flowers or a die cut flower and a die cut flourish.  And, instead of using the bold "Happy Day" title (also from the Starburst Saying stamp set and cut with the coordinating framelits) use a more elegant die cut stamped with a more elegant title.  Other products used on this card:  Regals DSP paper stack, Brights DSP paper stack, two sheets of Whisper White 8 1/2 x 11" card stock, Sahara Sand 12x12 card stock, Daffodil Delight stitched grosgrain ribbon, Regals and Brights candy dots, and Real Red photo matts and journalling strips.  To make that interesting Sunburst variation of DSP on the left hand page, start by cutting a 12x12 pc of designer paper into 8 x 12".  I then cut the paper in pie shaped strips -- not measuring accurately -- cause it's okay if your strips aren't all the exact same size.  Cut 2 each of six different designer paper colors. You then arrange them on your layout the way you want them to look -- starting with the two center strips and working out from there like a fan.  In the center where the strips meet, it will appear kind of messy where all the strip points converge.  Being careful not to cut too much, lay your title pc over the points and then trim those messy ends underneath where the title is going to go -- it will cover your messy ends quite nicely. :)  That's really all there is to this layout!

Happy Day to each of you! and remember! tomorrow is the last day to order from the Occasions Catalog, so if there are treasures in there you want, get em now.  Monday, June 2nd is the first day to order from the NEW CATALOG! and June 4th is the last day to order from the current catalog, so there is a little crossover there where you can order from BOTH!  There are also still some great treasure in the retired products blowout sale as well as the Clearance Rack -- so hop onto my website and check them out.