Wednesday, November 23, 2016

Christmas cards by the hundreds -- literally!

Hello Everyone!  Yep! I've been missing in action since, uh,.... October maybe????  BUT I DO have a few good excuses. :)  I recently organized a huge (well, it felt huge to me, anyways) fund raising event at my kids' school.  I am the new PTO president, as of late last year, and this event was my idea of a fund raiser.  I'll be honest, it was a pretty big leap of faith -- in so many ways!  We had a high quality arts and crafts show in one gym, a Kid Zone in another gym, bake sale to benefit our PTO, food booth for our 8th graders to fund raise with, and raffle fund raiser.  My worst fear was that no one would come to the event, but I'm happy to say the parking lot was packed solid for hours that morning, everyone was smiling from ear to ear, and the feeling of community coming together was simply, incredible.  Our two main goals for the event, was to draw the community together, and raise money for the school -- and we accomplished both!  Woo Hooo!   AND, I am very glad it's over! I have to share a couple of the decorating pictures with you, cause they made my little heart happy! A local wood worker made the palate trees, and I thought they looked so woodsy and natural, which was kind of my decorating theme for the event.  The LED trees made such an awesome little cheery accent for the entry way -- complete with little wooden snowflakes I found at Michaels.  AND, those incredibly cute little reindeer below the trees, were another amazing find I purchased from another local wood worker.  They are most definitely one-of-a-kind reindeer!  Those little red light bulb Rudolf noses! Sweet!


And, now, onto some Christmas card ideas to share with you.  I did my Christmas card classes differently this year -- Christmas card buffets.  There were 10 card choices to choose from, and folks could choose to make sets of 8 or 16 cards.  I think it helped make the classes run more smoothly, as there was less waiting for one particular card kit.  I had 24 folks attend between the three classes I did, and prepped around 400 cards, I think.  Lots of fun was had by all!  Here is the line up of designs!  I'd love to hear which ones are YOUR favorites.


 These little gingerbread peeps on a cookie sheet, was not my idea -- I saw it on Pinterest, and thought it was so incredibly cute! so had to share.  That patterned paper is the Candy Cane Lane DSP.  It is some of the prettiest Christmas paper I have worked with in a while.  Beautiful patterns, in some non-traditional colors -- like Crumb Cake and Espresso.


 This little flurries card, is made with the Snow Flurries punch and matching stamp set.  I also used the Fancy Frost Specialty paper for the background.  This paper has a raised pattern on it that isn't glossy as some of our other papers like this have been -- just a beautiful, raised pattern in heavy wt white.  Colors used: Island Indigo and Pool Party.


 The cable knit embossing folder, has made quite a sensation, as it is 3-D.  The dimension of your paper looks different with this folder, than it would with a regular embossing folder.  Also used on this card, is the bow from the Holly Berry Builder punch which happens to be on sale this week! and the sentiment is from the Christmas Pines set which is also on sale till the end of November.

 I always try and throw in a non-traditional color combo card, and this was the one for this year.  I ended up altering the card from this photo, as it needed some sprucing up. :)  I added a strip of gold glitter paper and a gold star which made it much prettier than this photo shows.


 My stash of washi tape has gotten out of control, so I told myself I may NOT buy anymore until I use up some of what I have, so this little tree card was the perfect thing.  I had strips of white card stock -- 2x4 1/4" and we added our strips of washi tape to the strip, and then die cut it with the tree from Santa's Sleigh.  I simply love that die set!  The sleigh is kind of fiddly, but the end result is really beautiful!  Colors used: retired Lost Lagoon, silver glimmer paper, heavy weight white.

 This little reindeer and wreath is also from the Santa's Sleigh bundle.  I guess I just really like this set, as I used it for three of the cards in the class!  Other products used: Woodland embossing folder, tree builder punch, silver glimmer paper.

 This card was by far the favorite choice all the way around.  I happened to have a bunch of Mossy Meadow card stock on hand, so I paired that with Pear Pizzazz card stock.  The Christmas background stamp - Merry Medley -- makes the perfect background to layer the pine cones and greenery using the peaceful pines thinlets.  The pine cones are cut from our new copper foil sheets -- simply a must have in my book. One nice thing I found about these dies, is that I could cut several pieces with one pass through the Big Shot, so it didn't take ages to cut the pieces you need if you were strategic in how you layered them onto your plate.

 Another non-traditional color scheme, using Sweet Sugarplum and the retired Blackberry Bliss.  I LOVE the star of light bundle featured here.  Such and elegant, different set than we've had in a long time.  Simply elegant and beautiful!

 I'm generally not a big Santa fan, but I thought this die -- detailed Santa -- was so unique, I just had to get it.  I think you could use those swirls at the bottom for waves on an ocean card or layout, or drifts of snow, or so many other things!

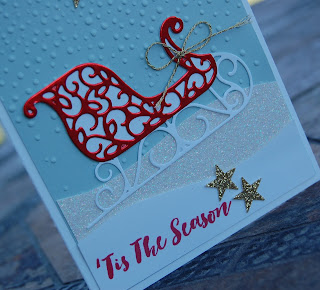
 Here is the sleigh from the Santa's Sleigh thinlets.  It is cut in two parts -- the sleigh base and the top piece which I cut from red foil paper.  You then glue the two parts together to make the completed sleigh. Of course, the Dazzling Diamons glimmer paper makes the snow bank look beautiful!

Whew! I think that's it for today!  Be sure to check out the amazing online extravaganza happening right now!  Just click on my website and shop away!  There is a big list of stamps on sale, as well as the extravaganza so be sure to check out both!

Happy Thanksgiving to each of you!


Sunday, September 18, 2016

It's Scrap-a-stack time!

Every fall for the past few years, I have done a "scrap-a-stack".  Each participant completes (10) 12x12 pages, in one sitting -- such a great way to get a good head start on your scrap books!  These are the pages we made this year.  One of my goals with this event, is to use up retired products -- card stock, designer papers, embellishments, etc.

This first one features a new product from the Holiday catalog -- the Start of Light bundle.  I LOVE that little "Milky Way" type flourish that comes in the stamp set, and the intricate die cut stars are beautiful!!!  One thing I learned recently, is that if you cut your glitter paper glitter side down with intricate dies, it works so much better.  These intricate stars are just such a die that works better this way.  To make that scalloped border, we used the Best Badge punch -- you just insert your DSP strip into the top of the punch and take "bites" out of the edge with the top cutting edge of this punch.  Easy peasy, and gives you another use for this punch.  We embossed the flourish on opposite corners using Versamark and White embossing powder.  Helps give it a great "pop"


This next layout, is a CASE from one that Lyssa made on Song of my Heart Stampers.  She is an amazing scrap booker (and card maker) and has so many tips to share regarding how to create a balanced looking page.  I just loved how easy this layout was, yet eye catching.  I really wanted to use my little acorn punch, as I hadn't featured it yet in a class, and it is so cute -- just makes me smile every time I see it!  I had these cute "first fish" photos, that also were taken in October, so I went with a fall look and folks could substitute in a title that worked for their photos.


Here is another layout inspired by Lyssa.  I had a ton of this Typeset DSP, and thought everyone would enjoy a vintage, black and white layout.  Since the paper is black and Vanilla, I used a Vanilla matt for the left hand page, with 11" strips layered on.  We used Soft Suede ink sponged over the whole page to soften the starkness of this paper, and help it all blend a little.


This next layout, BEACH Day, is a nice bright layout perfect for those fun summer pictures we all seem to have a lot of.  I had a lot of this Orange DSP, so this was the perfect page to use it up on.  The sail boat, kite, sun, and waves are all from the Swirly Bird bundle.  This is such a unique set, that I thought was down right unusual when I first saw it, but now that I have it, I have found SO many uses for it.  It makes the perfect sun (OR pumpkin, flower, wreath, you name it!).  The title features the new big alphabet set -- Letters For You.


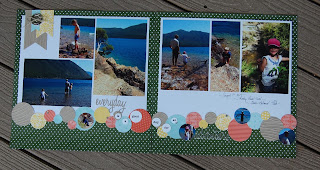
This "everyday adventure" layout was also inspired by Lyssa.  These kits varied a lot based on what DSP papers I had on hand, so each person's layout was different than their neighbor's.  Kind of fun.  This is basically just a bunch of punched circles used to make an interesting border.  The die cut words are actually from a Tim Holtz set I have.


Monday, August 8, 2016

Thoughtful Branches and beautiful ballerinas!

Happy Monday, Everyone!

Stampin' Up! has released a limited, exclusive bundle called "Thoughtful Branches", that is only available in August, while supplies last.  It is an amazing bundle that works well for so many applications -- floral, Christmas, Halloween, Fall, etc.  I haven't had a lot of time to play, but I have made several things with the Hydrangea flower (which can also be a tree topper).  All I can say is it is beautiful and elegant!  I love hydrangeas, and have a big white one blooming in my back yard.  They are elegant flowers that last a long time, so you get to enjoy them for a good, long while!

I had these lovely ballet photographs of my sweet little Sabina's first ballet recital, and I love how I was able to make these little hydrangeas match their little pink dresses perfectly!  The awesome thing about this layout, is that you could make the flowers any color you wanted to match whatever dresses they were wearing.  The background is neutral, so the flowers would be lovely in purple or blue -- more gorgeous hydrangea colors.  Anyways, it was fun creating this little girly layout.  The hostess of scrap club this month, also has a dancer, and I thought she would love having a layout to scrap some of those pictures with.  The fun thing about this set, is that you can make trees with that same flower topper, so for the club members wanting to scrap pictures of their boys, they can make a border with trees and a little picket fence!  A perfect solution for everyone!

My title says "DANCE like there's no tomorrow", but if you didn't have ballet pictures, you could make it say "LIVE" as the song actually says, and it would work for any pictures you had.  The background is white, and the borders are Kraft card stock that I embossed with the new Seaside embossing folder.  It creates a wavy pattern that adds a nice touch of texture.  I also used the long border die and the tiny flower accent from the Flourishing Phrases bundle to add that darling little pink border and flowers.  It is an easy die to cut with, surprisingly, and adds that girly touch I was going for.  The stems and leaves are cut from Pear Pizzazz card stock -- a nice soft green.  I used Pink Pirouette for the hydrangeas, and then spritzed them with a glittery spray to make them sparkly.

I recently got the Letters for You bundle, so wanted to use it in my title.  I love that the letters are big enough to make a statement without overpowering your page.  It's a bit of a spendy bundle, but not too bad if you earn it as a half price item, like I did.  I can see lots of ideas using it -- banners, name frames, scrap booking, etc.

I recently heard this idea for adhering intricate die cuts that I am really loving!  Get out your little silicone craft sheet, and take some Mulitpurpous liquid glue and scribble some glue randomly over your craft sheet -- creating an area of glue streaks about 4x4" -- then simply lay your die cut down on the scribbled glue, lift and stick.  It works best if you have all your die cuts ready in a pile, and glue them down all at once.  It works so well and doesn't require all that fussy applying of glue to the backs, or using up all your expensive Xyron refills.  This is my new go-to way to apply intricate dies. And once the glue dries on the sheet, you can just rub your finger over it and the dried glue balls up and comes off easily.  Whoever thought of this is genius -- Just Sayin'! and THANKS whoever you are! :)


Ok!  I'm off to do the things I do on Mondays! :)  Swimming lessons for the kids, a "puppy training" class for our little "Buddy", and gosh! do I ever need to clean up this house!  Somehow the weekends always turn the house into a disaster.  Not quite sure how that happens, but it does.