Showing posts with label Blended Bloom stamp. Show all posts

Monday, July 6, 2015

Blended Bloom meets "It's Wild" background stamp

Happy Monday, Everyone!

The new background stamp, It's Wild, caught my eye when I was looking through the new SU catalog.  I think I like it because it's unique -- different than anything we've had in my past 11+ years with SU.  I wanted to pair it with Blended Bloom -- one of my most favorite flowers to color.  I'm also loving the new Watermelon Wonder In Color -- a vibrant watermelon color that's not too pink, so I added that to my combo.  I kind of like how it turned out!  Wouldn't this be a cute card for a graduate or a good friend starting a new job?

Other products used: Whisper White, Basic Black, and Watermelon Wonder card stock, new Elegant Dots embossing folder -- for the leaves, Large oval punch, new lots of labels framelits, and the new white perfect accents.

Other ideas I have for this stamp, is to used it as a tone on tone -- like stamping it in the coordinating color of ink and card stock for a muted look.  For example, I think it would look lovely stamped in Smokey Slate ink on the same color card stock, or Blushing Bride ink on Blushing Bride card stock.  Can't wait to play with this stamp some more!


Monday, March 2, 2015

Stained Glass Easter -- "Indescribable Gift" stamp set


Happy Monday, Everyone!

I have been playing around with the stained glass technique lately, and wanted to share this card we will be making at my next club.  Note: this card was inspired by one I saw on Pinterest, by Teneale Williams -- https://www.pinterest.com/pin/497507090062226749/.  I loved the springy look of it, and the white embossing gives such a soft look.  I did my own twist on it, but the inspiration came from there.

This technique is really pretty simple: choose a stamp image that you can color in, stamp your image in Versamark ink on vellum card stock and emboss with your choice of embossing powder color.  Here, in the first card, I used white embossing powder, because I wanted a soft look, and in the second one, I used black embossing powder for a bolder, more modern look.  Once you have embossed the image, color the images in on the back side of your vellum using the Blendabilities markers.  They dry more quickly on the vellum than some other mediums.  You won't get a blended look necessarily, and that is ok -- I think the contrast adds to the final result.  What do you think????  The vellum front panel is adhered to a Whisper White card stock panel that is the same size, using glue dots in the corners, and then placing rhinestones over top to conceal the glue dots that want to show through the vellum.

Other products used on the first card: Calypso coral card base, whisper white card stock, Early Espresso card stock, Old Olive, Crumb Cake, and Calypso Coral Blendabilities markers, Calypso Coral chevron ribbon, and Basic rhinestones.


 This card, features the Blended Bloom stamp set and the little Valentines paper stack from the Occasions catalog.  I wanted to create a more modern, chick look with this one.

During the month of March, four NEW Sale-a-bration freebies have been added! -- a cute vellum paper stack, two stamp sets, and a set of In Color twine and button pack.  I'm excited about all of them.  Really great new options!  check them out by clicking the link below to my website.


Saturday, September 6, 2014

Ooh La La! Blended Bloom

Happy Saturday, Everyone!

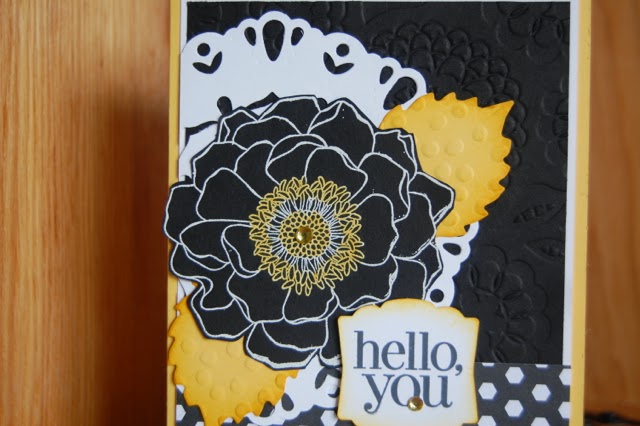
Today's card is one I made for a Wow card swap I participated in at Convention this year.  I have to say that I LOVE how this card turned out.  The color combo of Black, White, and Daffodil Delight is so striking -- hard to go wrong...


A super cool technique that I incorporated into this card is using the Blendabilities markers to color on top of a white embossed image.  So, I first embossed Blended Bloom using Versamark and white embossing powder on black card stock.  I then simply colored in the center of the bloom with my Dafodill Delight Blendabilities markers.  Because the card stock is black, you can't see the "out of the line scribbles" with the marker.  Pretty cool, right????  Really makes this flower pop.  I also colored the rhinestone with the blendabilities.

Of course, then I fussy cut the flower out.  Yep!  All 20 of them!  The leaf is cut from Daffodil Delight card stock from the Autumn accents die.  I simply embossed the leaves with the dots embossing folder and sponged the edges with Crushed Curry ink.  That gorgeous white doily thingy is the new Darling Doily thin lit die.  I don't know if any of you tried the doily die from the last catalog, but it was a bit HARD to use -- so much so that I stopped demoing it.  THIS one, however, is fabulous and comes out easily and beautifully every time.  SO happy as I love this look.  One trick, put waxed paper between your die and the card stock before you cut and your doily will pop out super easily.

The black panel is embossed with the Lovely Lace embossing folder.  I used the Artisan Label punch and a sentiment from the Regarding Dahlias stamp set, using the new Tuxedo Memento Black ink pad.  THE new awesome black!  In my opinion, toss your old SU Basic Black in the... uh ... trash... and get this new awesome one.  No more smearing, washes off your stamp easily, and gives you a crisp perfect image every time!  AND, it doesn't stamp purple as some of the old black used to do sometimes.  

That cute strip of black and white DSP is from the Black to Black pack.  I admit I wasn't sure how much I loved this paper, but in real life it is so much prettier than in the catalog -- and if you don't like one side of it, the other side is generally much better.  Just an FYI.

Ok! off to enjoy this gorgeous day!  Think I'm going to wash my dirty windows and not sure what else...  According to four year old Sabina, there is a lot of "Mama time" lined up for the day -- coloring together, Kinetic sand creations, and Barbies! :)  My little sweetheart is growing up... but I'm glad she still likes to be with me.  AND, she has the crafty bug as big as her Mama's which makes my heart happy.  She has her own desk and faithfully colors and paints every single day -- sometimes several times a day.  LOVE it!

If you haven't seen the new Holiday catalog yet, it is really great this year!  I think it is one of the very best yet.  So excited about it!

Until I stamp again!...

Wednesday, July 30, 2014

Blended Bloom gets a wash!

A new single stamp in this year's catalog, Blended Bloom, jumped into my online cart the first time I saw it.  It is a gorgeous image to color in -- either with the Blendabilities markers like I did here, or several different techniques -- like this Water color splash technique like we did at my last class or embossing it in white embossing powder on black card stock and coloring parts of it in with the Blendabilities markers -- stay tuned for a post on that technique later.  (Here is another link with all the detailed instructions of how to do this technique.)  A cute side note -- at my first scrap booking class after the new catalog came out, a long time customer of mine saw cards I had made with the Blended Bloom stamp and said, "Oh, I knew you would get that stamp!  I saw that stamp and said "THAT is a 'Beth' stamp."  I will admit, this stamp makes me happy. :)


This was a card we made at my stampers club earlier this month.  Besides the watercolor splash technique, I showed my peeps how to use the Daffodil Delight Blendabilities markers to color on top of the white embossing in the center of the flower to make that stunning center look so realistic.  Hard to see in this photo, but we also stamped the background of the card base with the same Blended Bloom image in Versamark to create that water mark look -- i.e. another use for the Versamark pad.  Those cute leaves are cut using the Autumn Accents die.  I showed how to use a stylus to create "veins" in the leaves to make them look more realistic, as well as sponging the leaf edges to add color depth.  Simple, but adds a wow factor.  Of course, I used the Itty Bitty Banners stamp set and matching framelits to create the little sentiments.  AND some Dazzling Details to add some sparkle to the flower centers.  The colors used on this card are: Rich Razzleberry, Mossy Meadow (a new In Color), Blushing Bride, and Shimmery White card stock for the flower part.  Important note: you DO need the shimmery white card stock to achieve this look with this technique.  Something about the way it resists water or something.

If you haven't checked out this weeks "weekly deals", you simply must!  The  Gift Bow Bigz Die is 25% off this week!  Besides making, well, bows... check out the adorable snowman or these santas or my favorite -- these little angel ornaments.  Such clever projects really thinking outside the box.  To see the weekly deals, click on the link below and then on the Shop button from my website.

Happy Wednesday to each of you!!!