Monday, December 26, 2011

My Personal Christmas Card

Merry Belated Christmas! :)  Christmas Eve and Christmas Day were both very busy days for me, so no time to post! so here it is anyways!  It's not SO far away from Christmas that you can't still enjoy it.
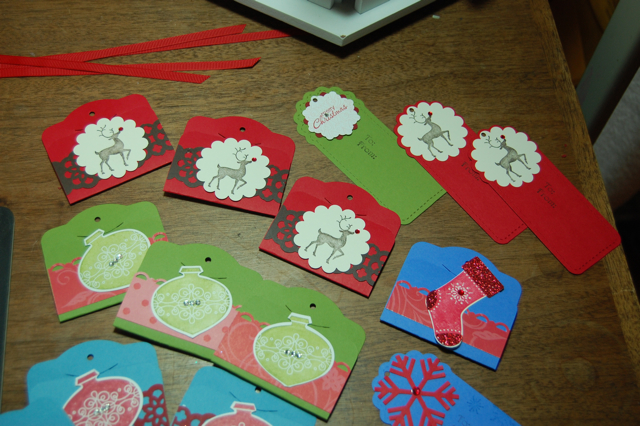
When I went to design my card this year, first, it needed to be easy, as we were traveling in December, I was taking a big exam, and, well, I just don't seem to have long stretches of crafting time these days -- just little snatches here and there...  Secondly, I wanted to use a set that, sadly, had never seen ink yet -- high time to pull out Tree Trimmings and make something gorgeous with it before that set retires.  Thirdly, I wanted a somewhat non-traditional color scheme -- which I half way accomplished -- I still threw some Cherry Cobbler in the mix because I just couldn't help myself....


The card base is Blushing Bride, embossed with the Snow Burst embossing folder, and then sponged with Champagne Shimmer paint around the edges.  I then stamped the ornaments with Cherry Cobbler, Blushing Bride, and Early Espresso -- and used a Pear Pizzazz marker to color in the branches from a stamp in the set -- Tags till Christmas.  They gave me the ferny little branches I was looking for.  The rest is quite self explanatory -- and many of you have received this card in the mail!  Simple, yet elegant -- and went together pretty quickly -- all excellent qualities for this year especially.
Supplies:
Card Stock: Blushing Bride, Cherry Cobbler, Pear Pizzazz, Whisper White
Ink: Cherry Cobbler, Blushing Bride, Early Espresso, Pear Pizzazz marker
Stamps: Tree Trimmings, Petite Pairs, Tags Till Christmas
Accessories: Scalloped Cherry Cobbler ribbon, Scallop # 2 die, 3" circle die, large oval and scallop oval punches, scallop border punch, snow burst embossing folder, Champagne shimmer paint, 2-way glue pen and Dazzling Diamonds glitter

Hope this inspires you to pull out a set you've never used before and make something lovely with it!

Thursday, December 22, 2011

Something Old, Something New,...

...but nothing borrowed, or anything blue!
Here is another glass block decor piece Christmas present!  I used the retired Birds and branches Bigz die, and the Frosted Flurries Sizzlit strip die for the snow flakes -- plus red, black, and white vinyl.  The snow flakes were tedious to extract from the die, but so worth it!  Filled with some beautiful faux snow (courtesy of Pottery Barn) and this will be such a beautiful centerpiece! ...or little ornaments, snow balls, cranberries -- suit yourself! :)
Of course, it had to have some bling, so I added plenty of the Basic Rhinestones to glitter it up!  So pretty in real life!


Happy last minute Christmas crafting!!! :)

Tuesday, December 20, 2011

A special Christmas present

My "baby" brother got married two years ago, now, and I have been meaning to make them a decorative glass block commemorating their special day.  I cut the design for the black die cut out of black vinyl using the retired Tulipe Bigz die (however, this die IS in the clearance rack if you're interested!), then a friend who has a Cricket, helped me cut out the vinyl words.  It was an excruciatingly tedious process to get the vinyl words transferred to the block, as they were so finely detailed -- definitely a nap time/Bryn in school -- only! type of project.  I do love how it came out, though, and hope they do too!  It looks so festive filled with little ornaments or faux snowballs and Christmas lights!


Don't forget about the Clearance Rack Blitz happening right now!!!  Tons of punches and designer paper and ribbon up to 80% off!  Click here to view these amazing savings: Clearance Rack Blitz.
Merry Christmas to each of you!!!

Tags, tags and MORE tags!

With Christmas less than a week away, I once again found myself scrounging for tags to put on my many beautifully wrapped gifts....  So much for having them all stamped and ready to go early this year.  BUT, better late than never, so I pulled out my Two Tags Bigz Die and cut out a bunch of tags in Real Red, Old Olive, and Marina Mist and got to work.  I love that die!  So easy to make some really cute tags REALLY quickly -- which is just what I needed!  In half an hour, I had all my tags ready to go -- and here they are!


The snow flake and the reindeer stamp are both from a new (to me) set -- Winter Post.  Just LOVE this set -- such an elegant snow flake and that little reindeer makes the cutest little tag topper -- just add a little rhinestone colored red with my Sharpie, and he's got a nose that glows!
Now, isn't he just the cutest on this little tag!!!!  I also used the lace ribbon punch to make that elegant little strip behind him -- easy peezy but makes it look so .... professional and time consuming, which it clearly was neither of those. :)  Of course, I also punched out some ornaments with the ornament from the Tags Till Christmas set, and also a little stocking with my stocking punch and matching set. 

Enjoy! and happy wrapping to each of you!

Thursday, December 8, 2011

Simple JOY Christmas card


Needing a quick and easy Christmas card this year?  Try this JOY card -- I simply stamped the letters from the Lovely Letters Alphabet stamp set on vanilla card stock, punched them out with the 1 1/4" square punch, and then used the scalloped square punch to frame them in black.  I then punched the edge of a little strip of Wild Wasabi card stock with the scallop edge punch, and embossed it with the Snow Burst embossing folder.  Finally, for that dazzling strip of silver along the bottom, I put a line of sticky strip along the edge of the card, dumped some Silver Glass Glitter over it, shook off the excess, and then 'burnished' the glitter (i.e. rubbed it into the sticky strip by laying a doubled pc of scratch paper over it and smoothing with my bone folder) into the sticky strip.  That glitter adds such a striking touch -- a whole lot of bling for $3.95!  And, just in case there isn't enough bling for you, add some rhinestones colored red and green with my trusty Sharpies.  (Speaking of Sharpies, I just saw a pack of 24!  Makes my little 10 pack look pretty elementary! Now I think I NEED the 24 pack...:) 
One last subtle touch on this card --I used the Delicate Doilies stamp set to make a background on the Real Red base.  Adds just a little extra to the design.

Supplies:
Card stock: Real Red, Wild Wasabi, Very Vanilla, Basic Black
Ink: Black, Real Red
Stamps: Lovely Letters Alphabet, Delicate Doilies
Punches: Scallop Square, scallop edge, 1 1/4" square
Accessories: Snow Burst embossing folder, Silver Glass glitter, sticky strip, Basic Rhinestones

Merry Christmas and Happy Stamping!!!

Monday, December 5, 2011

Halloween in December :)


A simple little Halloween layout using the owl punch and the pumpkin faces sizzlit die to make the cutest little ghosts -- just punch the owl out of white, trim off the feet, and turn it upside down and you have a darling ghost!  Add some scary faces with the pumpkin faces die, and you're set!  The little jack-o-lanterns are made with the pumpkin and pumpkin faces sizzlit dies.  I embossed "Happy Halloween" in white -- using the Hand Penned Holidays stamp set from the Holiday mini.  I love that set of stamps -- so elegant, and looks cute on this page even though you don't generally equate "halloween" and "cute" in the same sentence.
Other papers used: Frightful Sight DSP, Basic Black textured card stock, Pumpkin Pie and Whisper White card stock. 
Once again, a simple layout -- but the little ghosts really make it cute!  I'm not much of a spooky, creepy Halloween person, so cute is more my style -- and with those little munchkins to show off, a cute layout wasn't hard to do! :)

Happy Crafting!

Fall Scrap layout


Yes, I know, it's December and I'm just now getting around to uploading this Fall Scrap layout...  Better late than never, right? :)  The lighting wasn't the greatest in these shots, but you can still get the idea.  I used the gorgeous Spice Cake Designer paper, as well as More Mustard, Pool Party, and Soft Suede.  For the "Fall" chipboard letters, I first adhered the designer paper to chipboard using the Big shot Mulitpurpose adhesive sheets -- LOVE that stuff -- no waiting for glue to dry... I then cut the letters out using my Serif Essentials alphabet dies.  They add such dimension and uniqueness to this layout, I think.  And, of course, the little owls punched out with the owl punch, are an adorable touch.
To make the big sunflower, I used the Blossom Petals punch and punched out petals from the Spice Cake DSP, arranged them into a sunflower, added a crimped strip of Old Olive for a stem, plus a couple of leaves -- a perfect, happy sunflower!

Happy Scrapping to each of you!

Wednesday, November 30, 2011

Holiday Tin Lunchbox Organizer


A few years back, the little tin lunchboxes from Provocraft were all the rage.  Well, I still have a little "stash" even though Provocraft no longer makes them.  This designer paper is the Jolly Holiday DSP from last Christmas, and I just love the rich colors!  Cherry Cobbler is my all time favorite, anyways, so anything with that color in it is one I've gotta have!
For this little tin, I covered the outside with paper, the top and inside of the lid, and made six dividers for the inside -- perfect to organize holiday recipes, coupons, receipts, or gift and Christmas card lists.
The flower on the front is made using the Flower Folds die -- LOVE that die -- well worth it's expensive price as I have made dozens of gorgeous projects with it -- unlike some other dies I've purchased (pop-up cake die anyone?), and hardly ever used... 
I stamped the dividers using Baroque Motifs stamp set -- another favorite of mine.  So easy, but makes the ensemble so elegant....
That's all for now!  Trying diligently to complete my Christmas cards without TOTALLY neglecting my blog...
Happy Holidays to you and yours!


Thursday, November 17, 2011

Dasher in the Spotlight!


The little "Dasher" a la carte stamp, is such a darling stamp!  I just love his fancy antlers and prancing step.  Anything you make with him has a touch of elegance!  This card is one we will be making at "Lisa's Fabulous Crafty Christmas Party" coming up on Dec 2nd.  It is a simple design, perfect for new stampers, but has "step up" options for those who like to take it up a notch!  Add the Champagne glass glitter around the border using the Multipurpose Liquid Glue -- the stuff with the green lid.  And add a "spotlight" around his feet by punching an oval out of a sticky note using the large oval punch -- place the sticky note over the stamped Dasher image, centering the punched out space over his feet.  Hold in place and use a sponge dauber to add ink to sponge ink onto the oval space.  When you remove the sticky note, you have a nice "spotlight" where Dasher is standing.  Add some bling by outlining the oval with the "glue with the green lid", and sprinkling Champagne glass glitter over. 
The sentiment is stamped with the "Petite Pairs" stamp set -- this set is so versatile! and I love how there is a sentiment for the outside of the card AND one for the inside -- there's "Merry Christmas" on the outside of this card, "and a Happy, Joyful, Bright New Year" stamped on the inside.  How cool is that!  This set is only $20.95 in the clear mount option, and comes with 18 stamps! -- birthday, thank you, sympathy, Christmas, thinking of you, baby, etc!  LOVE this set.
For even MORE bling, I colored some of our Basic Rhinestones red with my red Sharpie and added them for his red nose and some "antler candy".  The Designer Paper used here is the Brights Collection Paper stack.  This paper is double sided, so you can go with the stripes, OR the elegant flourish design to make two unique cards.
Supplies:
Card stock: Real Red, Very Vanilla, Early Espresso, Brights Paper stack DSP
Ink: Early Espresso, Crumb Cake
Punches: Word Window, Modern Label, Large Oval
Accessories: Big Shot with the Scallop Circle #2 die and the 3" circle die, retired Early Espresso 5/8" satin ribbon, Basic Rhinestones, Red Sharpie, Multipurpose glue, Champagne glass glitter
Happy Creating, and give little Dasher a try, if you haven't already!

Sunday, November 13, 2011

Moonlit Trees Christmas card

Here is the final Christmas card we made yesterday at my Christmas Card Stamp-a-stack.  I just LOVE the moonlit trees effect -- so simple, yet so elegant.
I used the Top Note die to cut out a glossy white panel for the front, as glossy paper works best for this technique.   This is, of course, the good ole Lovely as a Tree stamp set that's been around since SU was born.  For the card on the left, I stamped the first row of trees in Island Indigo ink, then moved the stamp slightly to the right and down and stamped again to make the second, slightly lighter row of trees.  I then punched a 1 1/4" circle from a sticky note -- placed the circle over the tips of the trees, and used a stipple brush to apply Marina Mist ink to the tops of the trees -- just dab your brush on your ink pad, and then onto your glossy white panel with a straight up and down motion. 
To make the frosted look around the outside edges of the card, I used the Frost White Shimmer paint and a sponge dauber and brushed the paint all around the outside edges.  It gives it such a wintery look, and so easy to achieve! 
For the final sparkly touch, I used my two-way glue pen to apply lots of Dazzling Diamonds glitter to the edges of the trees and the "snow" at the bottom of the card.  In real life, this card is super sparkly!  And, that's pretty much it! an easy Christmas card with lots of "wow".
Supplies:
Card Stock: Glossy white, Island Indigo
Stamps: Lovely as a Tree
Ink: Island Indigo, Marina Mist
Accessories: Big Shot and Top Note Die, Polka dotted embossing folder, white organdy ribbon, White Frost shimmer paint, dazzling diamonds glitter

Tuesday, November 1, 2011

Stylish Poinsettias

What would Christmas be without a gorgeous poinsettia to complete your holiday decor!  Come to my Christmas Card SAS later this month to make your own stunning Poinsettia Christmas cards!  You can choose which style you would like to make -- the one on the left uses the Blossom Petals Punch to punch out the petals, and the one on the right uses the five petal flower punch -- punch two of them and layer them together to create this stunning little poinsettia.  Of course, I added a small silver glitter paper punch to the centers using one of the Itty Bitty punch pack punches and some rhinestones colored red with my trusty red Sharpie for the centers.  Just adds that little extra bling.  That gorgeous black flocked background is again from the Mocha Morning Specialties paper pack.  Isn't it so elegant! Hard to see in this photo, but I took a little Champagne shimmer paint on a sponge dauber and rubbed it over the embossed background to give the card a beautiful sparkly shimmer on the embossed pattern.

Supplies:
Card stock: Cherry cobbler, Very Vanilla, Sahara Sand, Basic Black, Mocha Morning Specialty dsp
Ink: Basic Black
Stamps: Teeny Tiny wishes
Accessories: Scallop Circles #2 die, 3" circle die, Blossom Petals punch, 5 petal flower punch, Itty Bitty punch pack, Basic Rhinestones