Showing posts with label Christmas 3-D projects. Show all posts

Saturday, December 12, 2015

Let it SNOW!

Happy December, Everyone!

I know, I've been missing in action for quite some time, BUT I DO have a really cute, super fun project idea to share with you today -- these oh so popular (at my recent craft fairs) SNOW letters.  I sold three sets of these letters.

Here's a brief description of how to create them, in case YOU want to make some snow letters for your mantel!

Start by tracing your letters, face down on whisper white card stock.  Cut them out -- cutting just inside your pencil line.  I then stamped designs from the White Christmas stamp set in Black Memento ink across the letters, making sure to make the 'snow line' consistent between the letters.  I used markers to color in the car, deer, snowman, and christmas trees.  I did stamp the car on an extra scrap and cut it out and put it up on dimensionals.  Just adds to the cuteness!  The snowflakes on the top portions of the letters, are from the Wonderland stamp set -- in this year's holiday catalog. It is a gorgeous set that I know I will use for years to come.  The snowflakes are stamped in Island Indigo ink, and then the top parts of the letters are sponged with Pool Party ink, making sure not to get ink below the "snow line".  For the final step, I sponged the outside edges with Island Indigo ink.

You are now ready to glue it all together.  I use rubber cement, and apply it directly to the letter then add my paper on top of them.  Make sure they are all lined up properly, and let dry.

The final touch is adding glitter to the snow areas and trees -- simply use your two way glue pen and scribble glue onto the areas you want to sparkle.  Then dump Dazzling Diamonds glitter over top.  Shake off the excess, and you are done!


If you haven't checked out the Year end close out sale, you really should!  There are some great deals to be had in there!!!

Have a fantastic Saturday.  I'm off to build a snowman now. :)

Monday, December 23, 2013

Festive Flurries meets the "Flip it die"

Hello Friends!
It's been forever.... since I posted to my blog... but here I am, at last, with Christmas presents mostly wrapped, and a cup of coffee at my side!

The card I have to share with you today features the new Circle card thinlets die as well as the Festive Flurry bundle from the Holiday catalog.  We made this card at one of my recent stampers' clubs.  That gorgeous designer paper, is the Winter Frost specialty designer paper -- also from the Holiday catalog.  The circle card thinlets die allows you to make a super cute fun fold card with just one pass through your Big Shot machine.  Notice the extra fold in this card -- featuring an extra folded over portion for more space to write.  Scroll on down for photos of how to place your card stock into your die to create this fold.


 To make that extra "flap" on your card, start with a 5 3/8" by 8 1/2" piece of card stock -- like you would use for any standard A2 card.  (Note that I made the card stock a hair narrower than 5 1/2" so it will slide through the die easily.) When placing your card stock into the flip it die, center the front end under the die as normal -- the end with the circle that will be the front of your card.  For the opposite end, pull your cardstock up through the die, so the tail is on TOP of the die preventing it from cutting that end of your card stock.  When you run it through your Big shot, the "tail" end of your card stock will have a crease rather than a cut edge -- fold on that crease mark so that the flap folds in towards the inside of your card. You now have that extra flap that you can write your message behind. This technique simply expands the ways you can use this super cute die!

Here is another card featuring this die:


A very Happy Holiday season to each of you!  May you have plenty of turkey and get every single thing on your crafty wish list! :)
Cheers!


Sunday, December 23, 2012

THE Christmas Ornament....

The 3-D Christmas ornament on the front of the SU Holiday catalog, was a "must try" for me.  I had grand plans of making one for each and every one of my crafty friends, BUT..... they are really, really time consuming and I think I managed to create 6 of them.....  It features the Ornament Keepsakes stamp set with it's matching framelits, a LOT of time, a significant amount of glue, and even MORE significant amount of glitter, and several sticks of glue for your hot glue gun! :)  As much work as they are, the final result is stunning!  Well worth trying, all though you might want to start in July rather than November...  For a step by step tutorial, visit any number of You-tube videos out there right now -- such as this one. :)  Maybe someday when both of my kids are in school and I have endless amounts of time on my hands :), and I'm not working :), I'll do You-tube videos, too! LOL

I tried several different color combinations, including Baja Breeze with Navy, Pink Pir with Cherry Cobbler, Gumball Green and Cherry Cobbler, and some Rich Razzleberry and Certainly Celery ones, which haven't been completed yet. :)  The one featured here is Pink Pirrouette and Cherry Cobbler -- made for my Seattle friend who has a fun display of pink ornaments from her late grandma.  I thought this ornament would go perfectly with her collection -- AND it's a nice change from the traditional red and green... 


Happy Holidays to you and yours!

Thursday, December 22, 2011

Something Old, Something New,...

...but nothing borrowed, or anything blue!
Here is another glass block decor piece Christmas present!  I used the retired Birds and branches Bigz die, and the Frosted Flurries Sizzlit strip die for the snow flakes -- plus red, black, and white vinyl.  The snow flakes were tedious to extract from the die, but so worth it!  Filled with some beautiful faux snow (courtesy of Pottery Barn) and this will be such a beautiful centerpiece! ...or little ornaments, snow balls, cranberries -- suit yourself! :)
Of course, it had to have some bling, so I added plenty of the Basic Rhinestones to glitter it up!  So pretty in real life!


Happy last minute Christmas crafting!!! :)

Wednesday, November 30, 2011

Holiday Tin Lunchbox Organizer


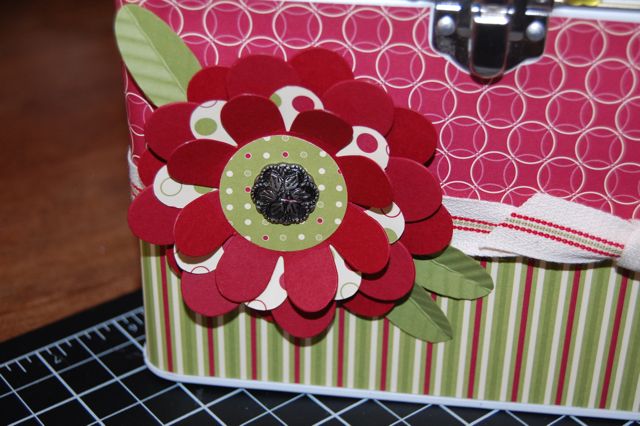
A few years back, the little tin lunchboxes from Provocraft were all the rage.  Well, I still have a little "stash" even though Provocraft no longer makes them.  This designer paper is the Jolly Holiday DSP from last Christmas, and I just love the rich colors!  Cherry Cobbler is my all time favorite, anyways, so anything with that color in it is one I've gotta have!
For this little tin, I covered the outside with paper, the top and inside of the lid, and made six dividers for the inside -- perfect to organize holiday recipes, coupons, receipts, or gift and Christmas card lists.
The flower on the front is made using the Flower Folds die -- LOVE that die -- well worth it's expensive price as I have made dozens of gorgeous projects with it -- unlike some other dies I've purchased (pop-up cake die anyone?), and hardly ever used... 
I stamped the dividers using Baroque Motifs stamp set -- another favorite of mine.  So easy, but makes the ensemble so elegant....
That's all for now!  Trying diligently to complete my Christmas cards without TOTALLY neglecting my blog...
Happy Holidays to you and yours!


Thursday, November 18, 2010

Tin O' Christmas Tags Class

Tags, tags, and more tags!  I got a bunch of these tins from the SU clearance rack a while ago, and decided they would be perfect to make a little Christmas tin full of tags!  So, there you have it -- this is my next class -- scheduled for Dec 11th at 10:30 am.  I thoroughly enjoyed stamping all these cute tags with the "Tags Till Christmas" stamp set from the Holiday mini.  LOVE that set! and I know it will come out this time of year for years and years to come!

Supplies:
Card Stock:
Jolly Holiday DSP 
Cherry Cobbler
Old Olive
Whisper White
Very Vanilla
Marina Mist
Chocolate Chip
Real Red

Inks:
Cherry Cobbler
Old Olive
Marina Mist
Real Red

Accessories:
Linen thread
Vanilla, black, ans white 1/4" grossgrain ribbon
Punches: -- Decorative Label, Tag punch, large tag punch, scallop oval, Ornament punch, 1 3/4" circle, 2 3/8" scallop circle
2-way glue pen
Dazzling Diamonds glitter
Rhinestones -- and a black Sharpie to make the Santa buttons black!