Wednesday, December 23, 2015

Delicate Ornaments Scrap layout

Happy Christmas Season, Everyone!  Wow, has it ever been a busy December for me!  But, now I am relaxing in warm San Antonio with family, and having a few minutes to breathe and relax.  Feels amazing!

We made this sweet layout at my last Scrap booking class, featuring the Elegant Ornament dies and matching stamp set.  You definitely need a little patience to cut these intricate babies out, but I think the result is totally worth it!  They are really beautiful dies!  Of course, one also need lots of glitter for a Christmas layout, so I used plenty of Silver Glimmer paper as accents.  Also featured in this layout, are the Sleigh Ride Edgelits (which are already sold out from the Holiday catalog).  They are by far one of my most favorite things from the Holiday catalog -- so many great ideas out there for using these.

Sorry for the poor quality of these photos -- these pages were much prettier in real life, but at least this gives you an idea.  I wanted to use the big ornaments to make a "tree" on the left hand page, and I loved how it turned out!  The little "star" on the top is little accent die from this set, meant to layer onto the big ornament, but also looks awesome as a star.


Ok! That's all for today!  May each of you have a beautiful Christmas with those you love!!!

Saturday, December 12, 2015

Let it SNOW!

Happy December, Everyone!

I know, I've been missing in action for quite some time, BUT I DO have a really cute, super fun project idea to share with you today -- these oh so popular (at my recent craft fairs) SNOW letters.  I sold three sets of these letters.

Here's a brief description of how to create them, in case YOU want to make some snow letters for your mantel!

Start by tracing your letters, face down on whisper white card stock.  Cut them out -- cutting just inside your pencil line.  I then stamped designs from the White Christmas stamp set in Black Memento ink across the letters, making sure to make the 'snow line' consistent between the letters.  I used markers to color in the car, deer, snowman, and christmas trees.  I did stamp the car on an extra scrap and cut it out and put it up on dimensionals.  Just adds to the cuteness!  The snowflakes on the top portions of the letters, are from the Wonderland stamp set -- in this year's holiday catalog. It is a gorgeous set that I know I will use for years to come.  The snowflakes are stamped in Island Indigo ink, and then the top parts of the letters are sponged with Pool Party ink, making sure not to get ink below the "snow line".  For the final step, I sponged the outside edges with Island Indigo ink.

You are now ready to glue it all together.  I use rubber cement, and apply it directly to the letter then add my paper on top of them.  Make sure they are all lined up properly, and let dry.

The final touch is adding glitter to the snow areas and trees -- simply use your two way glue pen and scribble glue onto the areas you want to sparkle.  Then dump Dazzling Diamonds glitter over top.  Shake off the excess, and you are done!


If you haven't checked out the Year end close out sale, you really should!  There are some great deals to be had in there!!!

Have a fantastic Saturday.  I'm off to build a snowman now. :)

Sunday, November 8, 2015

Christmas cards by the dozen!

It's that time of year again, where I host my Christmas card stamp-a-stack -- folks choose to make 10 cards (2 each of five designs) or 20 cards (4 each of five designs).  These are by far my best attended classes of the year.  In fact, sometimes I see people at these classes that don't come to any others throughout the year.  Anyways, this year I prepped 350 Christmas cards, so I was determined not to make them too involved or I would STILL be cutting card stock.  I try to do a mix of styles in this class -- some cutesy, elegant, non-traditional color theme, etc.  Here is the lineup!

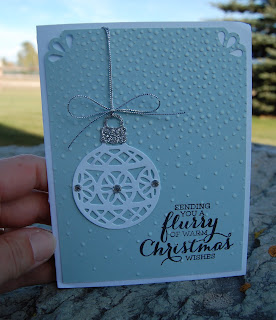
 For this first card, we are using the new Delicate Ornaments thinlet dies to make that beautiful ornament.  Such a simple card, but has some class I think.  Of course, it is helpful to stamp the sentiment FIRST, and then emboss the Soft Sky panel with the Softly falling embossing folder.  I then added some white craft ink to the embossed dots to look like snow.


 Here is a less traditional card, using Crumb Cake, Cherry Cobbler, and Very Vanilla.  Featured on this cards is the Holly Jolly Greetings bundle, that comes with the word stamps that coordinate with the die cut words -- jolly, merry, and peace.  Love this set.  the little wood snowflake elements add so much to a Christmas card -- here, I used a sponge dauber with Cherry Cobbler ink and added some ink to the snowflake to make it pop.  So easy to do, but changes the look of the snowflake!

 The Flurry of Wishes bundle features these beautiful snow flakes that have a matching punch, that punches out two snowflakes at once. The medium sized snowflake in this set, coordinates with the flower medallion punch. I like the elegant style of these flakes.  Again, I used a sponge dauber dipped in Island Indigo ink to color the wood snowflake blue.  I then added Dazzling Details to the snowflake to make it glitter!  Oh, how I love sparkle!

 This is my favorite card -- inspired by some I saw on Pinterest.  This is again a non-traditional color scheme.  You start with a white panel -- stamp the trees from the Winter Wonderland set in Memento black ink.  I stamped once, and then again without re-inking to give that look of some trees being in the background shrouded in mist.  Next, I used a sponge in Marina Mist ink and added blue ink towards the base of the trees, then Wisteria Wonder ink above that with that color fading out towards the top.  I then added white "snow" to the branches with the white chalk marker.  Once the card was fully assembled, I scribbled some Dazzling Details onto the entire trees to further make them "pop".  A little strip of silver glimmer paper at the bottom, and a Winter Wonderland embellishment finishes the card!

 This little penguin card is a total CASE of one I saw on Pinterest, so I can't take any credit for this one.  I thought the igloo was so incredibly cute, that I just had to share.  It is one of the oval framelits cut in half.  Then use the large oval punch to punch out the 'door'.  This little penguin is from the Snow Place bundle -- THE cutest snow people you've ever seen! and a framelit to cut out each little accessory.  If you love all things snowmen, you will LOVE this set.  Sabina was especially excited to get this set. :)  To make the oval look like an igloo, simply emboss it with the brick wall embossing folder, then sponge with ink -- here I used Coastal Cabana, a retired color.   Of course, I had to have some glittery snow. :)  So I used a 4 x 2" piece of the Dazzling Diamonds glimmer paper -- simply cut it in a curvy line and that gives you two snow banks to use on cards.

Ok!  That's it for today!  Happy Sunday to each of you and may you get your stampin' ON!


Saturday, October 31, 2015

Happy Halloween from the Sleigh Ride Edgelits

Happy Halloween Everyone!

I had this idea to use the sleigh ride edgelits for a Halloween card, because I thought those little houses would look so cute on an orange and yellow background.  This technique is done the same way as we did this card, only I used Crushed Curry as my first layer of ink, then Pumpkin Pie ink for the second layer, and Cajun Craze ink at the very top.  I think it is really great -- how versatile these little edgelits are -- I've even seen some beach scenes with the houses.  Fun stuff right here!  And, HOW did I make those darling little pumpkins????  Those are the apples from the tree builder punch!  Simply punch them out of pumpkin pie card stock, color the stems green, and use a stylus to add some lines, making it look like a sectioned pumpkin.

Ok! that's it for today!  Have a happy and safe and spooky Halloween.


Friday, October 16, 2015

Happy Scenes Bundle is so versatile!

The Happy Scenes bundle from the holiday catalog, is so incredibly versatile!  You can make winter, Christmas, Halloween, or fall cards easily with this stamp set and framelits.  I have seen so many gorgeous creations on Pinterest with this set.  For my last Stampers' techniques class, I used the same card pieces to make both a fall and Christmas card, so people could choose to make the one they wanted.  I used the new Black glimmer paper from the holiday catalog for the window frame, so the window frame is glittery!  The window box is cut from the corrugated paper.  It is a really fun textured paper, that is perfect for a wood kind of look.  We used an aqua painter and ink pads to color in the pumpkins and grass, etc.

Other products used on this card: Brick Wall embossing folder, gold and silver foil doilies, washi label punch, inks: pumpkin pie, old olive, real red, crushed curry, memento black, pool party.


Happy Day to each of you!!!

Thursday, October 15, 2015

Sleigh Ride Edgelits and a starry sky!

This card was inspired by Lydia from Understand Blue.  She does amazing stuff with coloring!!! and I was so incredibly inspired by her card, that I had to teach it to my peeps.

We started with a 4x5" panel of the thick whisper white card stock.  You do need to use the heavy wt card stock because you are adding a lot of color and moisture and lighter wt would not hold up.  We first sponged the entire panel with Bermuda Bay ink.  Put a lot of ink on -- not just a light layer.  Next sponge Night of Navy ink onto the top third or so of the panel.  Lastly, add Blackberry Bliss ink to the very top fourth or so.  Go easy with the Blackberry ink or your whole card will end up purple! :)  The final step is to splatter your panel with water -- dip your fingers in water and flick the water at the card stock OR you can spritz your panel with water to create a more even look.  The top card was spritzed and the bottom ones were "flicked".  At the class, some of the gals did a combination which looked really cool -- spritzed AND flicked. To me, this technique almost looks like Northern Lights in the sky.  Such depth of color.  I'm no color genius like Lydia, :) but I think the layers of sponged color gives you the depth of color when you add the water element.  We used a heat tool to speed up the drying process of the panel, then adhered it to a white thick card stock base.  We used the sleigh ride edgelits from the Jingle all the way bundle to create the winter scene.  If you do a Pinterest search for Sleigh Ride Edgelits, you will seriously HAVE to have these.  So many gorgeous cards -- and the new fine tip glue pen works great for adding a tad of glue to the little houses, sleigh, and trees when you're fastening it all down -- just sayin'!  In the first card, we cut the houses from silver foil paper.

Please excuse the poor lighting in the second photos here.  I took them when we were having all the forest fires in Montana in August, and this is truly how yellow it was outside!


Woodland Beauty

Happy Thursday, Everyone!

One of my very favorite things in the Holiday catalog, is the woodland embossing folder.  It is a 6" folder, so you can orient your card either horizontally or vertically.  Yeah!  I just love the natural birch tree kind of look it creates.  I saw a card similar to this one on Pinterest, and thought it was so pretty, so I gave it my own twist and used it for my Stamping Techniques club at my last class.  The little cardinals are from the White Christmas stamp set.  We stamped them on the tree branches, and then colored them in with a Real Red marker.  After embossing the Crumb Cake panel with the woodland embossing folder, we then used an Early Espresso marker to color in the "bark" openings in the tree trunks.  Next we added White craft ink to the trees with a sponge dauber.  We dried it with a heat tool to keep the ink from smearing.  Note: to get your white craft ink on the little branches without getting it where you don't want it, use a Q-tip! :)  We made  little snow bank for the bottom of the card, using the dazzling diamonds glimmer paper.  I simply cut a 2x4" piece of the glimmer paper, and cut it in a curvy line with my paper snips, creating two perfect snow banks for two cards at once.  The red border at the bottom, is the new red foil paper from the holiday catalog.  LOVE it! So beautiful!!!  I embossed it with the softly falling embossing folder -- also from the holiday catalog.

For the final touch, we added the wood snowflake elements -- another darling embellishment from the holiday catalog.  I love these little guys so much, I am using them on TWO of the cards we will be making at my Christmas card Stamp-a-stack.  Here, I just added the plain snowflake, but you can use a sponge dauber to color it and then add glitter on top -- Oooh la la!!!

For the final touches: use the new fine tip glue pen and add a little trail of glue on the branches.  Then dump a healthy portion of Dazzling diamonds glitter on top, and you get that kind of 3-D look of snow on the branches.


My kids don't have school today, and there are BIG PLANS!  Bryn is going fishing with his friend, and Sabina is having five little friends over for a tea party/play date -- "fancy dresses welcome, but not required."  I found a Frozen themed tea party set, and she has been working on the "tea party decorations" non stop since she got home from school yesterday.  Gotta love these little moments in their lives!  Each one is unique and special, and they all go by way too fast!!!

Saturday, October 10, 2015

Shabby Chick scrap book layout

Happy Saturday, Everyone!

I know, it's been a while. :)

Here is a layout we did for my scrap club last night.  I always try to taylor the layout to the person who is hostess, and this month, my hostess was Megan who loves everything shabby chick.  So, I reached for my Timeless Elegance DSP and had some photos printed in Sepia tone and Woo La La, here is what came out!


 I added a flourish in the upper left and right corners using Versamark and Iridescent Ice embossing powder -- just to add a bit of sparkle.  We used the awesome Triple banner punch to punch those perfect flags!  Love that punch and use it all the time!  It is kind of spendy, but so useful, in my opinion.  Other punches used: Pansy, Petite Petals, and Fun Flower punches. The Basic Gray strip was embossed with the brick wall embossing folder.  A great feature of this folder, is that it is 6x6, so it will emboss 6" at a time, not leaving a space in the middle when you try to emboss a 12" strip.  Pretty awesome!

That's it for today!  Off to watch Bryn do his very first jiu jitsu tournament!  Yeah!  Go Bryn!!!!!

Sunday, September 20, 2015

Back-to-school Scrap-a-stack time!

Once a year, I do a "scrap-a-stack" where the participants each make 5 or 6, 2 page, 12x12 layouts.  I use this opportunity to use up retired card stock and designer series paper and ribbon/embellishments I have on hand.  I usually only do five layouts, but this year I made six and couldn't decide which one to eliminate, so I gave my peeps the option of doing 5 layouts for $30, or all six for $35!  Well, all but one person chose to do all six.

Yesterday was my first of two classes.  The next group comes next Friday.  We had lunch and treats and music -- it was a fun day of crafting!

All of these pages were based from sketches or designs I saw on Pinterest.  Many of them look quit a bit different than their inspiration, lol, but none-the-less I did want to give credit where credit is due.  I also used some non-SU products here and there -- gasp!

This first layout features the SU Project Life paper clip thinlet dies.  These are the coolest little things! You can add them as an accent on any photo or card element, etc.  I used them here just to add the date, place we went, etc. Also featured, are the vintage leaves bundle.  I knew I had to get these leaves immediately when they came out.  They are so realistic, and you can die cut them with framelits after stamping them.  Such a nice, realistic touch to these pages.  Of course, the FALL title was made by adhering designer paper to chipboard, then die cutting the letters using my retired Bigz alphabet dies.  I love the dimension the chipboard gives the letters.  Colors used: Early Espresso, More Mustard, Old Olive, Cajun Craze, and Crumb Cake.


This layout, "everyday moments", was proclaimed to be the most time consuming at my class yesterday!  When I made this layout, I wasn't happy with it, so I kept adding stuff to it to try and "salvage" it.  Does that ever happen to you???  Well, if it does, take heart! it still happens to me after all these years of doing this!  I started this layout wanting to use the red background cardstock, because I have a lot of it.  I also wanted to draw out the little red pants Sabina was wearing.  The green "grass" at the bottom, is another bunch of gumball green card stock I have.  So,.... perhaps trying to use up stuff I have a lot of doesn't always work out the best.  Ha ha!  At any rate, more about the layout.  I used a 4" strip of gumball green card stock for the grass -- cut it in half on a wavy line and then used the fringe scissors to make the grass cuts.  The little trees and clouds and apples are made using the new Ronald McDonald set ($3 from each set is donated to the Ronald McDonald house by SU) -- Sprinkles of Life stamp set and the tree builder punch.  To me, this is a must have set and punch.  There is SO much you can do with this set -- from cupcakes to clouds to apple baskets to pumpkins (with the little apples) to ice cream cones.  Even my five year old loves to play with this set -- she makes nests and all sorts of things from the tree tops, as well as cupcakes, OF COURSE!  Anyways, other things featured on this layout are the Hearts border punch, retired scalloped ribbon border punch, and the new (in the holiday catalog) curvy corner trio punch.  Colors used: Real Red, Basic Black, Whisper White, Gumball Green, Wild Wasabi, and Pacific Point.


This layout was a "grid" type layout I saw that I thought would work so well for four horizontal pictures, so I pulled out these darling Alpine Slides pics.  I had this stamp that said "enjoy the ride" which was so appropriate for these pics,  I thought.  I had a whole pack, almost, of this Sale-a-bration designer paper from last year.  The colors went nicely with this retired Primrose Petals card stock I had a lot of, so away we went!  The designer paper is cut into 4x6 pieces -- simply adhere in a grid pattern and put your photos in the empty spots.  Other featured items: the retired banner punch, the retired Flower Frenzie Bigz die (which is currently in the clearance rack), the extra large oval punch, petite petals punch, and decorative label punch.


I was inspired to create this layout from a similar one I saw on Pinterest.  I loved the grid look on the second page, and wanted to do a winter layout for the class.  I had these word dies that say "winter wonderland" and thought they looked so gorgeous in the silver glimmer paper.  I also wanted to show case the new Flurry of Wishes bundle from the Holiday catalog -- a gorgeous snow flake stamp set and matching punch.  I layered the middle snow flake on top of a metalic foil doily.  Such a pretty touch.  The "snow, Brrr, and joy" words are from the snowflake card thinlet die that is on the clearance rack for a screamin' deal.  Just sayin!   Colors used: Pool Party, Smokey Slate, Whisper White, and silver glimmer paper.


For this layout, I wanted to use up some really bright designer paper that I had, as well as a ton of washi tape I have accumulated.  This is what I came up with.  I wanted to scrap Sabina's fifth birthday photos of her in her rainbow unicorn costume -- when we went to get "princess pedicures" with her little friend, Shannon.  She looked adorable sitting there getting her toes and nails done with her little costume on.  This girl is all about rainbows -- draws one on almost every picture she makes.  Products used: Washi tape assortment, Star confetti border punch, triple banner punch, and label braket punch.  To make the number "5", I covered a piece of chipboard with strips of washi tape, then die cut it with my Bigz numbers die.  Colors used: Old Olive, Melon Mambo, Tempting Turquoise, Whisper White, and Daffodil Delight.


These photos are courtesy of "Wyrick Photography" from my friend, Celeste Wyrick.  She came to visit last summer and snapped a few shots of my kids.  Bryn, especially, is hard to photograph as he hates having his picture taken, and when you do get him, it tends to be a crazy face.  She was able to capture both of them in an amazing way.  It was right around their 4th and 9th birthdays, so I put the numbers -- 4 and 9 on the pages.  I chose the title "Just Be You" because these photos are so "them" -- Sabina is always picking flowers and Bryn always has a funny grin.  The background card stock is Bashful Blue -- a long retired card stock.  I stamped a flourish from Flowering Flourishes stamp set on the corners in Marina Mist ink as well as the title.  I used Night of Navy card stock to add a little accent with the floral frames dies -- layering two of the nesting dies together and running it through my Big Shot to create that little accent for the top and bottom middle of the pages.  Other products used: Tripple banner punch, Lots of Labels framelitsHello You thinlet dies, and the retired Tasteful Trim Bigz xl die.


Ok! That's it for today, folks!  Happy Sunday to each of you and may you be inspired to SCRAP BOOK! :)