Monday, June 10, 2013

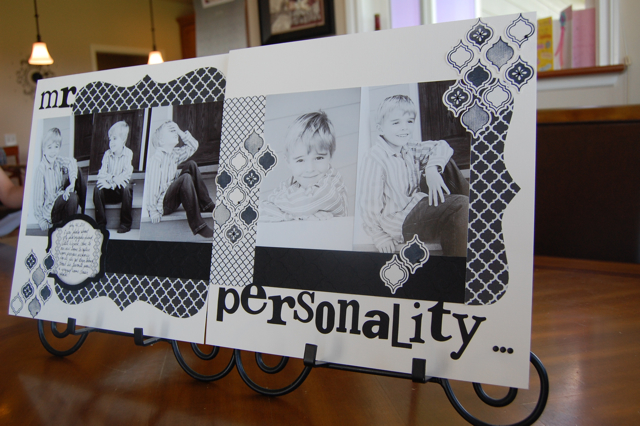
Mr Personality!

Life has been crazy busy around our home with end of school things going on, a parking lot garage sale/fund raiser at Bryn's school, and a certain big boy's 8th birthday party this past Saturday. Thirteen 7 and 8 year olds racing around our back yard for 2 hours!  Wow!..... There has been NO time for this mama to play... Well, yesterday, I told the kids that I needed some time to myself -- that they needed to find some things to do, as Mama was going to STAMP!!!  and, they mostly entertained themselves, only interrupting me for important things like food and potty help for the almost three year old.

SOOO, this is what I made.  It is a scrap layout for my scrapping class this coming Friday night, and it features some beautiful, unique, hot-off-the-press new SU treasures, such as: the Modern Medley Designer series paper, the mosaic punch, the matching Mosaic Madness stamp set, the Modern Mosaic embossing folder, the new, awesome! candy dots, and the Deco Label framelits (used for the journaling).  These are photos that a photographer friend, Celeste Wyrick of Wyrick Photography, took when she did a photo shoot for our family shortly after we moved into our new (to us) house 2 years ago.  I have never made a black and white layout before, and whenever I teach a scrap booking class, I always try to do something I haven't done before, to try and keep it interesting and fresh.

The inspiration for this layout, came from a super cute hexagon layout I saw in the CTMH catalog.  There are so many places to find inspiration, and when I saw what they had done with the hexagons, I was thinking, "Hey! I am going to do this idea with a black and white layout with my new mosaic punch and stamp set".  I have to say, I really do like the way it came out.  If you live near me, come to my class this Friday at 6:30 and make it for yourself! :)

Oh, and if you haven't checked out the brand new catalog, click on the link in the upper right corner, OR if you're one of my customers and haven't gotten your very own, gorgeous copy, email me for your free copy today! :)

Happy Monday to each of you!


Sunday, May 26, 2013

One card, Three ways

At my last club classes, I wanted to show the double embossed frame technique -- see this link for step by step how to do this. It is such a cool technique that is really not that hard to do.  The only thing I did differently, is that I made the opening in the chipboard for the back of the first folder, slightly larger than the size of designer frame, so that a larger rectangular non-embossed section was created.  Hope that makes sense...

Here are the cards they could choose from:

This first one uses the "Happy Hour" stamp set
 For this second one, I used the "World Spectacular" stamp set -- pretty much a CASE of the idea Dawn had in the video link above.
 And this one uses the "Just Believe" stamp set -- which is soon to retire.  Boo hoo!


We used Crystal Effects on the leaves to make them shiny, as well as on the tips of the peacock feathers in the above sample. 

The colors used here, are Lucky Limeade (soon to retire), Midnight Muse, and Whisper white -- along with several strips of designer paper from various packs.

If you haven't gotten all the retiring products you are longing for, be sure to get them before they're gone!  Hope on my website in the link below and check out all the treasures that are 40% off!  My favorite accessory that's retiring, is the Blossom Petals Builder punch.  You can search my blog for amazing things I've made with this punch -- including dogwood flowers.  In my book, you simply can't live without this punch! :)

Happy Sunday to each of you!!!

Wednesday, May 8, 2013

55 and counting!

For any of you who DIDN'T know, this is Teacher Appreciation week! :) and how I do appreciate Bryn's teachers VERY much.  I am involved in the PTO for his school, and this year we decided to make gifts to give all the teachers and staff at West Valley School during Teacher appreciation week.  In the PTO meeting, guess who they all turned and looked at for heading up the gift creating campaign? :)  Yep!  You guessed it.  Me!  And, I was gladly up for the job, provided I had a little help putting them together.

The volunteers to help with the project, were a little on the sparse side, and I was feeling a teeny bit overwhelmed before I had even started.  Then low and behold, my wonderful, super crafty friend, Leah, (whose children don't even go to West Valley!), came over and spent the entire afternoon cutting out purses and gluing them together. When she left, the purses were all cut out an mostly assembled and I was feeling like I really could pull it together.  What a great friend!!!

There are 55+ teachers/staff at the school, so it was a bit of craftiness to put them all together.  We are giving out little gifties on Monday, Wed, and Friday of this week.  Here are the Monday ones: Decorated water bottles with a little hand stamped tag and a pouch to hold a Crystal Light packet.

The tag measures 2 1/8" by 11 and scored at 2 1/4" and 8".  Then, simply fold the bottom scored part up and adhere with brads on either side, and use the 1 1/4" circle punch to punch the hole in the top flap to go over the water bottle.  I cut strips of designer paper 1 1/2" x 12" to put around the bottles and adhered with sticky strip.  Easy embellishments using the large and small butterfly punches layered together.  Simple gift, but definitely brought a smile to every recipient!


 Today's gift, was a little purse (using the SU purse die) with a chapstick inside that was donated by my generous boss, Connie Small, DDS.  I used Pretty in Pink card stock here -- a color that is soon to retire, and embellished the fronts of the purses with a little rossette -- from the rossette trim in the spring mini catalog -- simply snip off a rossette, dab its petals on an ink pad, and you have an instant classy embellishment.

 For the guy teachers, we made this "manly version".  Simple tri-fold with a section of designer paper on the front and back, and a star embellishment.  Sorry the photo isn't better...

I somehow missed taking a photo of the Friday giftie -- it is a pint jar filled with mulit colored salt water taffy (courtesy of Costco).  I punched out a circle of designer paper (using my 2 3/8" circle punch -- which fits perfectly on a narrow mouth jar lid, just FYI) and adhered that to the top of the lid, then tied a cute stamped tag around the top with colorful ribbon.  Another PTO person is delivering those, as I am working on Friday, so she came and hauled them all away -- thus no photos -- sorry!  I feel glad to have them finished, but is sure was rewarding to see the smiles on their faces as we went from class room to class room delivering our gifts.

To all you teachers out there, THANK YOU!!! for all you do for our children!!!

If you haven't checked out the retiring stamps and accessories, take a look!  There are some fabulous goodies on sale while supplies last.

Happy stamping and crafting to each of you!

Sunday, May 5, 2013

Going, Going, Gone! Card Buffet!

Tis' the season where Stampin' Up! retires a bunch of stamps and accessories to make room for new treasures soon to be released in the new catalog -- June 1st.  I always feel compelled to give my favorite sets a final debut!  I am having my "Going, going, gone! card buffet" on Saturday, May 18th at 10 am, and here are the treasures there will be to choose from.  These are easy cards to create -- 10 min or less kind of cards.  Click on the link at the bottom of this post to check out the stamp sets and accessories (some marked down to 40% off!) that are retiring, and get them before they're gone!

This first card features the single stamp -- Quint-Essential Flower -- for $8.95.  It coordinates with the 2 3/8" and 1 3/4" scallop circle punches and 1" circle punch. Simply stamp in three colors -- here Pumpkin Pie, Cherry Cobbler, and Old Olive -- and punch out with the punches.  Layer together using stampin' dimensionals, and you have a great, easy card.  Other retiring products used here, are the Vintage Wallpaper embossing folder, the Tiny Tags stamp set and Jewelry tag punch, and the polka dotted scalloped ribbon. 

 This cute little trendy vase with the flowers, is from the all occasion set -- "Button Buddies".  I simply colored the vase with a red marker, the flower stems with an Olive marker and punched out little flowers with the Itty Bitty punch pack.  Added some rhinestones and what a cute little card!  Other retiring products used here: Bashful Blue card stock and ink, and the sentiment -- from the Made for You stamp set.
 A topiary card made with the retiring "Circle Circus" stamp set -- and a variety of circle punches.  Super easy card, but a really fun effect.  For the flower pot, I used the decorative label punch.  Other retiring products used here: Certainly Celery card stock and ink, the "Friendly Phrases" stamp set.

 "Just Believe" stamp set is one of my very favorites!  So sorry to see it go...  Here I did a simple color blocking technique -- use your clear block, ink it up, and "stamp" it onto your white card stock panel.  Then stamp your image on top in a darker ink.  The background inks used here are Certainly Celery and Baja Breeze -- both of which are retiring.
 A simple sympathy card featuring "French Foliage" stamp set.  A lovely set for fall, of course, but also great for summer cards, too.  The lacy brocade embossing folder used on the little strip of Lucky Limeade card stock, is also retiring.  Boo!!!
 I put Crystal Effects on the little blue leaf to give the card some dimension.
 "Sweet Floral" is a lovely background stamp.  Here I simply inked the stamp in Riding Hood Red ink (a retiring color) and stamped it on the same color card stock -- added pearls to the flower centers, and a sentiment from the also retiring "Punch Pals" stamp set.  Added a butterfly punched from designer paper, and some ribbon.  Easy peasy, but lovely just the same.
 "Elements of Style" stamp set takes Vintage to a new level.  Here I stamped the floral branch image on a Labels framelits die cut, used a sponge dauber to add some Marina Mist ink to the flowers, layered it on a strip of dsp from the poetry print pack, added some crochet trim, and some Crystal Effects to the flowers -- and punched out the sentiment.  Done!

This final card features the retiring Build a Blossom stamp set and the matching Blossom Petals builder punch.  Of all the things retiring this year, this punch makes me the saddest.  I use this punch ALL the time -- for leaves, fancy flowers, you name it.  So versatile!  Sob!  Anyways, I simply stamped the petals on Baja Breeze card stock, punched them out, and created the focal flower by adhering the petals to a punched circle using Tombow multi glue. 


Hope this inspires you to do some crafting, too!  Hop on my website and see what retiring treasures YOU can't live without.

Happy Sunday!

Saturday, April 20, 2013

Birthday Bash -- cards by the dozen!

I recently did my first "Birthday Bash" card class -- you could choose any 8 cards for the $15 class fee, and then make as many extra cards as you wanted for $1.25 per card.  The idea was to make enough birthday cards for the whole year featuring everyone on your birthday calendar.  Here are some of the cards there were to choose from:
 A Pinwheel card of sorts -- you start by layering two 2 5/8 x 2 5/8" Midnight Muse card stock squares on top of each other as shown.  Next, punch out 4 squares each of designer paper with the 1 1/4" square punch and layer them in an alternating pattern over top of the first two squares you laid down -- put a brad or button in the middle where all the little points come together, and you've got an easy, but wow card!
 Simple masculine card using the Harvest Blessings stamp set and the window frames framelits.  I embossed the Crumb Cake card base with the Hexagon embossing folder from the spring catalog.  The Dotted Scalloped Ribbon punch adds just a little decorative border underneath the designer paper (from the Poetry Prints stack in the spring catalog).
 This Angry Birds card is a case of a card I saw on Pinterest.  Chevron embossing folder for the background, and various SU punches for all his parts.
 This is a case of a card I saw on Mary Fish's blog -- great little card for a teenager.
 Simple cupcake card using the cupcake punch in it's traditional way.
 Hello Kitty card -- cased from an idea I saw on Pinterest
 Ultra simple trifold card
 Perfect for your grandma kind of card -- featuring the Everything Elenor stamp set.
 A card featuring the Secret Garden and matching framelits (in the spring catalog) -- another case from a card I saw on Mary Fish's blog
 Simple layered butterflies -- check out the mini butterfly punch available in the spring catalog!  Layers perfectly on top of the larger butterfly in the current catalog.
Ice cream cone card using the cupcake top as the ice cream scoops.  The cone is made using the Pennant Parade stamp set and punched out with the Pennant builder punch.  The embossed cloud background is the cloudy day embossing folder from the spring catalog.

Hope this inspires you to do a little crafting this weekend! :)

THE cutest Easter Bunny on the planet!

For my last scrap booking class, I wanted to do an Easter layout -- so I searched the web for some cute new Easter ideas and ran across this adorable Easter Bunny and the little "hatching chicks" on Pinterest.  Just too cute not to share, so here they are!


The bunny is made with a huge pile of punches and Basic Grey, Pretty in Pink, Whisper White, and Very Vanilla cardstock.  Here is the list of punches: the head is the ornament punch, the body is the 1 3/4" round punch, ears -- large oval punch and retired small oval punch, feet -- large oval punch, hands -- large petal from the petals builder punch, cheeks -- current small oval punch, eyes -- current small oval and the owl punch, nose -- owl punch.  The little chicks are the 1 1/4" scallop punch with the owl punch used for the eyes, and the beaks a folded triangle of pumpkin pie card stock punched with a petal tip from the petals punch.  For their little tufts of fluff on their heads, I took a little piece of Daffodil Delight seam binding and attached it to the back, then unraveled the end to look fluffy and trimmed it to the look I wanted.  The egg shells -- punch some wide ovals out of Melon Mambo, Wisteria Wonder, and Bashful blue card stock that has been pre-embossed with the square lattice folder.  Cut them free hand in a zig zag pattern and stick the little chick inside one of the halves. 

For those amazingly sparkly Easter eggs, I used one of my favorite Glitter Magic techniques -- simply apply the Big Shot multipurpose adhesive sheets to your favorite designer paper -- here I used the Tea for Two pack from the Spring catalog -- punch out your eggs using the wide oval punch and current small oval punch, burnish the egg a little with a bone folder so your adhesive sticks really well, peel off the adhesive backing and dump dazzling diamonds glitter to the sticky surface, shake off the excess and you have a lovely sparkly Easter egg.

The title is made with the Lovely Letters alphabet and postage stamp punch.  Easy peesy.

Enjoy your Saturday, and if you haven't seen all the fun specials going on right now, be sure to check them out on my website -- just click the link below. :)