Thursday, November 27, 2014

Thankful for "World of Dreams" stamp set

Happy Thanksgiving, Everyone!  Before I get cooking and baking (my signature dutch apple pie :) I wanted to post these simple thank you cards I made with the (new to me) "World of Dreams" stamp set.  I recently won this stamp set for free from SU, because I achieved a demo challenge that I participated in.  Yippee Skipeee!  I LOVE free stuff, and I have wanted this set since the new catalog came out.  I especially love this little flower/or grasses silhouette stamp in the set.  Perfect for creating a sunset/moonlight scene.

I used one of the oval framelits to create a reverse mask, through which I sponged the inks to create my moonlight/sunset scenes.  For the moonlit one, I used Bermuda Bay, Pool Party, Soft Suede, and Early Esspresso inks.  I used a 1 1/4" circle punched from a sticky note to mask the moon.  When I was done with the initial sponging of the sky colors, I removed the circle mask and then used another sticky note torn in a wide "V" shape, and laid that on top, so just the bottom of the "valley" overlapped the edge of the moon, and sponged more Bermuda Bay ink along the edge to create that mountain in the background look.  I love how it looks like the moon is peaking up over the mountain.  For the Sunset one, I first sponged the panel with Crushed Curry ink and then put my circle mask on for the sun, as I wanted the sun to be yellow, then sponged Tangelo Twist ink over top.

The thank you sentiment is from the set "Lots of Thanks" -- an absolute must for all your thank you card needs.

If you haven't checked out the Online Extravaganza sale going on through Dec 2nd, you simply must!  This is truly one of the best sales I've ever seen SU offer -- many wonderful punches on the 50% off list, the Big Shot magnetic platform for 40% off, and tons of ribbons and glimmer paper 50% off!

AND, if you've ever thought about joining SU, there is a pretty sweet recruiting deal going on this week as well -- join between now and Dec 2nd for 25% off the starter kit price -- get $125 worth of product for $75! AND get an additional 5% cash back on all commissionable purchases during the month of December.

Have a very Happy Thanksgiving Day! and take the time to make a list of all the things, both big and small, that you are thankful for today....


Tuesday, November 25, 2014

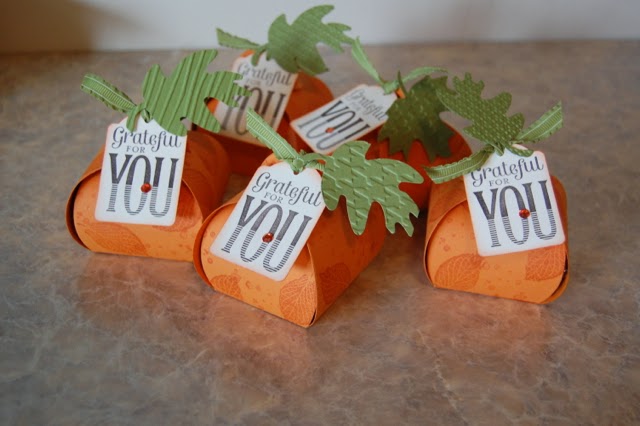
Grateful for you! -- curvy keepsakes die

Happy Tuesday, Everyone!

The new curvy keepsakes die in the holiday catalog makes the perfect little Thanksgiving giftie.  I created several of these, and filled them with chocolates, to give to my kids' teachers.  There are HUNDREDS of cute ideas for many creative critters you can create with this die on pinterest.  For this project, I had limited time and just wanted to whip up a cute little project in record time.  I used a retired fall stamp, Fantastic Foliage, to stamp the die cut pieces, first.  That cute little tag is created with the Merry Everything bundle.  Love that "Grateful for You" sentiment -- and so easy -- just stamp and punch.  The leaves are made with the Autumn accents Bigz die and embossed with various embossing folders.


Don't forget about the amazing online Extravaganza sale going on right now through Dec 2nd!  OR join SU (between now and Dec 2nd) and save 25% off the starter kit.  Get $125 worth of SU product for $75! Contact me for more details.

Saturday, November 15, 2014

Daydreams Medallions goes Christmas!

Happy Saturday, friends!

Today, I have a scrap layout to share with you that I created for my scrappers' club earlier this year.  It features some retired DSP from last year's holiday catalog, as well as the Daydreams Medallions stamp set and coordinating Floral Frames framelits.  I love how these stamps can be used for lots of different occasions -- beautiful as a floral theme, as well as a holiday wreath kind of look, (see the Christmas card with the birds in this link) or how I've used it here -- basic Medallion.  This layout is pretty self explanatory -- colors used are Pool Party, Island Indigo, Smokey Slate, and Whisper White.  Of course, a little of the retired silver shimmer paper gives it that "pop".  The silver word, "Merry", is from the retired expressions thinlits.  LOVED those dies! A bit tricky to cut out, but a gorgeous result.  That little silver frame for the title, is also retired.  They were in the Clearance Rack for a long time for a really good price, so I acquired quite a few. :)


New weekly deals started this past Tuesday!  The Window frames framelits are on sale, as well as the half inch circle punch and the 7/8" scallop circle punch, some ribbons and buttons.  Good deals to be had!  Don't forget about the Holiday supplement as well!  A fabulous star kit in there!  Simply assemble 26 amazing 3-D stars to decorate for the holidays, create place setting decor, or create ornaments to give to all your favorite peeps.

Ok! Off to prepare for "Family Fun Night" tonight at West Valley School.  I am signed up to make four batches of white chili, as well as do the Costco shopping for the event. :)  Sure am glad I will have Bryn along to push the second cart, as I know I won't be able to fit it all into one cart.  Costco on a Saturday.... Hmmmm ... CAN'T WAIT!!!!!

Happy Day to you!

Friday, October 24, 2014

BOO to you and you! -- Fall Fest Bundle

Happy almost Halloween!  We have two very enthusiastic trick-r-treaters in our house, gearing up for some serious fun.  Bryn is going to be the "headless horseman" this year, and 4 year old Sabina was going to be a princess AGAIN, as she has been for the past couple years, so I suggested that perhaps she should be something else this year, so she immediately pipes up, "Okay! I'll be a unicorn then!" Yep, we are now the proud owners of a unicorn costume.  Earlier this week, I was trying to get the kids out the door as I had to go to work, and Sabina was not too happy about being "hurried", and was insisting on wearing her unicorn costume to school.  Guess who won????  Some battles are just not worth fighting, so off she went in her unicorn costume and tiara and a bag of cheerios "in case she didn't like the breakfast they serve".  What a case!

If you haven't checked out the Fall Fest bundle yet, it is CUTE!  One thing I love about this bundle, is that it isn't just fall or just Halloween -- but both in one.  Those little ghosts are seriously cute!  I cut two out of the silver glimmer paper, and the rest just out of white.  To make the eyes, I punched the holes with my 1/8" round punch and stuck a pc of black card stock behind.  I had a ton of Halloween pics from last year that I wanted to put into this layout, so I used more pictures than would have been needed.  That cute Halloween paper is the Motley Monsters DSP.  In my humble opinion, it is some of the cutest Halloween papers we have had in a long time.

We made this layout for my last club class.  Fun to see pictures of everyone's little "monsters". :)  I used the word bubble framelits and stamped various Halloween sentiments from a bunch of different sets in white craft ink.  Then, used white word bubbles for my journaling pieces.


Saturday, October 18, 2014

Seasonally Scattered gift boxes

For my last club class, we made these little gift boxes using the Seasonally Scattered stamp set, the scalloped tag topper punch, and the decorative window gift boxes which are on sale in the weekly deals this week -- 6 boxes for $3.71!  I love that these little boxes are food safe, so you can put cookies or fudge or candies in these and give them to your coworkers for a little special something.

I showed how you can stamp the Thanks stamp in Crushed Curry ink, then take a sponge dauber and add a little Cajun Craze ink just over the word before you stamp, to give you a two tone look.  Add a few of the gold sequins from the gold sequin trim, and you have a lovely tag for your box!  Use that same sponge dauber to add some cajun craze dots to your box base.  These would make a super cute Thanksgiving place setting/giftie.  Add a few Autumn wood elements and a die cut acorn or leaf from the Champagne glimmer paper for that perfect touch.

OR, use the "Merry" stamp to make a cute Christmas giftie box.  Of course, you NEED some of those frosted sequins and "All is Calm snowflake embellishments" to make it over the top! :)


'Tis the Season -- almost!

Happy Saturday, Everyone!

I love Christmas, and I REALLY love this year's Holiday catalog!  So many gorgeous stamp sets, punches, and embellishments to choose from. Ok, I didn't do that much choosing -- I basically bought it ALL!  Yikes!  Here is my line up of holiday cards we will be making at my upcoming, annual Christmas card Stamp-a-stack.  (To read all about these classes, or RSVP for a spectacular Christmas card making extravaganza, :) visit my meet up group and RSVP for the date that suits you -- space is limited, first come first serve. http://www.meetup.com/Flathead-Valley-Stampers/)

This first card features the "Seasonally Scattered stamp set.  I simply stamped the "Merry" in Night of Navy ink, then the "Christmas" in Real Red ink (from a hostess only exclusive stamp set -- Good Greetings -- available to all hostesses who have a $300 or more party during October) on a Whisper White panel.  After stamping, I embossed the panel with the Filigree Frame embossing folder.  Of course, I added some bling as that's what I'm all about!  the frosted sequins add that little special touch, AND you get a TON of fun for that $4.95!  There are a lot of sequins and little beautiful white snow flakes in that little container.  I also used a little dazzling details to the design for a bit more sparkle.  A very easy card, but lovely, I think.

If you love stars, you're gonna love this one featuring the Bright and Beautiful stamp set and the star framelits.  Also featured on this card, is the All is Calm washi tape.  I used a little scrap of card stock,  covered it in several patterns of the washi tape, then use a star framelit to die cut the center washi tape star.  The All is Calm snowflake embellishments are the perfect accent for the center of my star.  Colors used in this card, are Lost Lagoon, Soft Sky, and Whisper White.  That gorgeous silver star, is some retired Silver glimmer paper.  However, there is a new beautiful silver glimmer paper that you could sub in for this card.

Third in the line up, is this cutie pie snowman/trees card featuring a new set from the Holiday catalog -- White Christmas.  There are so many possibilities with this set, but I was trying for a simpler creation as people will be making a lot of cards at this class.  I stamped the trees and snow man in Memento Black ink on Kraft card stock, then colored in the white areas with the chalk marker.  The snow flakes are once again, from the Frosted sequins assortment.  I added a little strip of red glimmer paper along the bottom, and used my two way glue pen to add some Dazzling Diamonds glitter for the snow.  For the falling snow, I stamped the little dots in white craft ink.  A note of caution with white craft ink, it takes a little longer to dry, so either let your panel dry for a bit first, or use a heat gun to dry it more quickly before assembling your card.
Another product I love from the Holiday catalog, is this little paper stack called Trim the Tree paper stack.  You get a lot of bang for your buck with this little stack -- lots of darling patterns that you could use for Christmas and beyond!  I wanted to create a simple card featuring the Bloom for You stamp and the matching Fun Flower punch.  I always love a set that you can stamp first, and then punch it out.  Makes it so easy to create something lovely in a snap.  I used the new this year dazzling diamonds glimmer paper for the flower center -- punching it out using the 7/8" scallop circle punch.  I added a few colored rhinestones to the flower center, using my trusty red sharpie to color them red.  The Christmas sentiment uses a stamp and matching punch from another holiday catalog set -- Merry Everything Bundle.  The Early Espresso panel on this card is embossed with the woodgrain embossing folder.
Last, but not least, the Festival of Trees bundle was a must on my Christmas wish list this year.  The little photopolymer tree stamp set, has a matching punch, so you can stamp first and then punch out some darling little Christmas trees!  Super cute for cards or tags or anything Christmasy.  Love this little bundle!  Also used on this card, is the Endless Wishes stamp set, some more silver glitter paper, the word window and modern label punches, and the All is Calm specialty designer series paper.  I am convinced you couldn't possibly make anything ugly with this paper.  It is gorgeous! and has two sheets of silver foil paper in the pack as well.  A must have, in my book.  That little strip of silver is the silver 1/8" ribbon.  Colors featured on this card: Lost Lagoon, Pear Pizzazz, and Whisper White.  I used a few touches of silver sparkle dazzling details to add something special to the tree.  Fun, fun, fun!  Just a reminder, for best results when using photopolymer stamp sets, stamp your image with the stamp and pierce mat underneath.  It helps you get a better image.  Also, if you find that you aren't getting a good image with your photopolymer stamps at first, try rubbing the surface of the stamps with an eraser, or give them a rub on your jeans, or scrub them thoroughly on your stamp n scrub.  Sometimes there is a little coating on these stamps that you need to remove before they will take the ink well.


Wednesday, October 15, 2014

By the Tide meets Faux Tile technique

Happy Wednesday Everyone!

Here is a swap I made for a techniques swap I participated in this past SU Convention.  My chosen technique, was the "faux tile" technique.  I wanted to create the look of light shining through ocean waters -- highlighting the sea shell on the ocean floor.


I used the Gorgeous Grunge stamp set to stamp the splatters on the folded Island Indigo card base.  The other card stock colors used here are Calypso Coral, Soft Suede, and Whisper White.  I scored my panel on my diagonal score plate first, then I stamped the shell in Crisp Cantaloupe ink, the coral in Soft Suede ink, and the sea horses and splatters in Island Indigo.  After I finished my stamping, I sponged the panel in Island Indigo ink and Soft Suede along the bottom.  The final step, is to completely coat the panel in Versamark ink and then emboss it with clear embossing powder.  The result is a shiny tile look.  I used the Delicate Designs embossing folder to add texture to the Coral strip on the front, and the Dotted Scallop Ribbon border punch for the Soft Suede accent.  My fellow swappers at Convention really liked my card, which made me feel really special.  One gal said to me that she has been swapping for years, and this is the very best swap she had ever received.  I think that possibly may be the best compliment I have ever received!  It so made all the work I put into it worth it.

For more details of how to do the Faux Tile technique, visit this blog post: http://stampedwithflair.blogspot.com/2014/03/faux-tile-technique-meets-lovely-as-tree.html

If you haven't checked out this weeks weekly deals, hop on my website and check them out!  The Darling Doily Die is on sale!  I LOVE this die, and it is so easy to pop out compared to the old one we used to have.  Several other Big Shot options on there, too.  The little decorative window gift boxes are also on sale -- 6 of them for $3.71!  These are perfect boxes to put treats in at Christmas time.  Just sayin'...

Have a great day, Everyone!